B-5.3 Use Oxy-Acetylene Equipment
You must understand the correct procedures and safety precautions to use when assembling, testing, lighting, adjusting, shutting down, and disassembling a portable oxy-acetylene outfit.
Always follow general fire safety procedures. Work in a well-ventilated area. Have a charged and appropriate extinguisher nearby and a hot-work permit, if required. Remove all combustible materials from work area.
Assembly, Light-Up, Shutdown, and Disassembly of a Portable Oxy-Acetylene Setup
To avoid accidents, you must follow an organized procedure for assembling an oxy-acetylene unit.
- Secure the cylinders in an upright position. A safety chain is commonly used to secure cylinders to a portable cart so they do not tip over or get jarred (Figure 1). The cylinder cart is designed to roll easily when tilted back on the wheels, yet be stable and secure when stationary.
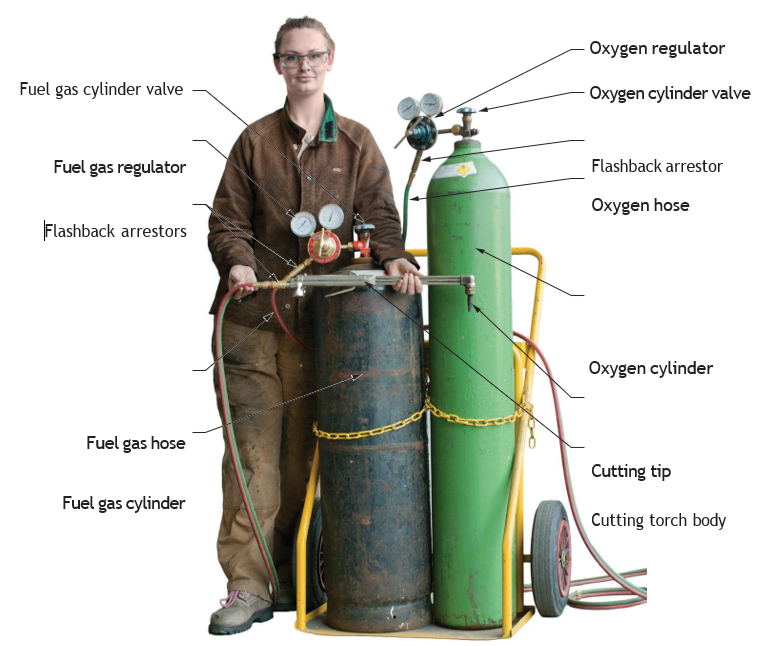
- Remove the caps covering the cylinder valves once the cylinders are secured. The caps match the size and colour of the cylinders. Oxygen cylinder caps will typically be red or green, and acetylene caps are typically black. Cylinder caps should always be in place when transporting or storing cylinders.
- Before attaching the regulators, “crack” the valves by opening them slightly, then quickly closing them. This clears any dust or foreign particles from the valve outlets. Stand to the side of the valve outlets and make sure they are not pointed toward you or another person. Any particles inside the valves will be ejected with tremendous force.
- Match the regulator connections to the cylinder valve connections. Start turning the nut by hand (it should turn easily), then tighten it with an appropriate cylinder wrench. Do not force the nut to start. If it is cross-threaded, it will not turn easily, and the threads will be damaged. Never over- tighten fittings. Remember, oxygen fittings have right-hand threads. Note that the oxygen cylinder valve is externally threaded on the regulator connection, while the acetylene valve is internally threaded.

Never lubricate fittings. Oil or grease combined with pressurized oxygen will ignite and cause an explosion. Machined fittings need no lubrication.
- Turn the pressure-adjusting screws out (counter-clockwise) on both regulators. This closes off the regulators so that working pressure gauges are not permanently damaged when high-pressure cylinder gases are allowed to flow through the valves.
- Install reverse flow check valves (RFCVs) or flashback arrestors to regulator connections and tighten them. Make sure to use RFCVs with correct arrow markings for the direction of gas flow. RFCVs have left-hand or right-hand threads to match with corresponding connections.
- Connect the hoses to the correct RFCV or flashback arrestors. The oxygen hose must be connected to the right-hand threaded RFCV or flashback arrestor, and the acetylene hose to the left-hand threaded RFCV or flashback arrestor. Avoid over-tightening the fittings.
- Turn the oxygen cylinder valve wheel counter-clockwise very slowly to prevent damaging the regulator. Watch the cylinder gauge. When maximum pressure is reached (the gauge needle will stop), turn the valve all the way open until it stops.
- Turn the acetylene cylinder valve wheel or wrench counter-clockwise very slowly, watching the cylinder gauge at the same time. When the pressure reaches maximum pressure (when the gauge needle stops moving), turn the valve [latex]\frac{1}{4}[/latex] to [latex]\frac{1}{2}[/latex] turn more (this may vary slightly) to maintain that pressure. The small amount of turning provides for a quick closure of the valve should an emergency situation occur. If a cylinder wrench is used on the acetylene cylinder valve, leave it on the valve. Note that when adjusting the cylinder valves, working pressure gauges remain at zero. Note: Always stand to the side of regulator and gauge faces in case the regulator fails.
- Attach the RFCVs to the torch handle (remember to match the arrows to the direction of the gas flow). Connect the hose to the RFCVs. Most workplace regulations advise using RFCVs at both the torch handle and regulator hose connections.
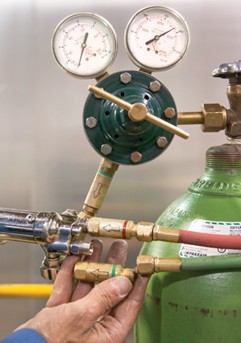
Since RFCVs are sensitive and may become plugged, it is recommended that they be tested once a week.
- Place the welding tip on the torch handle and hand-tighten the nut. Never use a wrench or pliers to tighten the connection, as this can damage seals inside the tip.
- Adjust the acetylene to the correct working pressure first. Open the acetylene torch valve no more than one turn. Turn the acetylene pressure-adjusting screw clockwise for higher pressure until the working pressure gauge reads 3 psi. This setting may vary, as different tip sizes and torch designs require different pressures. Refer to the manufacturer’s specifications for correct settings. Next, close the torch valve gently, to prevent damage to the torch valve seat.
- Follow the same procedure to adjust the oxygen to the correct working pressure. The working pressure gauge should read 5 psi (again, this may vary).
The torch is ready to use, except there is always the possibility that one or more of the oxygen or acetylene fittings may be leaking.
Testing For Leaks
Step 12 in the previous procedure has left the cylinder valves open, the working pressure gauge is set at 5 psi for oxygen and 3 psi for acetylene and the torch valves are closed. The system is considered to be pressurized from the cylinders to the torch valves and will remain so, if there are no leaks.
Before you start to use the torch, you should always check the line for leaks, whether the equipment is being assembled for the first time or the setup is used repeatedly. The line should also be tested after any new cylinders or parts have been installed.
Larger leaks can be quickly detected by closing the cylinder valves after correctly setting the working pressures. If a cylinder gauge shows a pressure drop, there is a leak. Smaller leaks may be detected the same way, but it will take longer for the pressure drop to show on the gauge.
To quickly determine if a small leak is present, increase working pressures to 10 psi after opening the cylinder valves. After adjusting the working pressure, close both cylinder valves again and watch the cylinder pressure gauges for pressure drop. Make sure the torch valves are closed.
If a gauge indicates a leak, use the following methods to pinpoint it:
- Listen, smell and touch around connections, hoses and fittings for a leak.
- If the leak cannot be found by those methods, apply a soapsud solution to possible leak areas. Bubbles will appear where there is a leak.
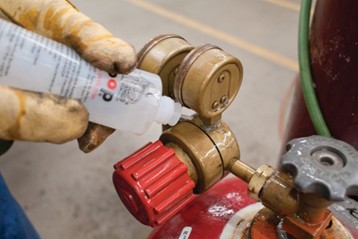
Note: Never use oil or flame near equipment when looking for leaks.
- Repair the leak, if possible, then test the system again. When cylinder pressure readings remain constant, the system is okay. Be sure to adjust back to recommended working pressures after testing is done.
The equipment is ready for adjusting and lighting the torch.
Light-Up
Equip yourself with shaded safety goggles, heavy leather gloves, coveralls, boots and a welding cap.
- Take a few minutes to familiarize yourself with the feel of the torch and striker while wearing gloves. Practise using the striker, holding it about 25 mm (1 in.) from the end of the welding tip.
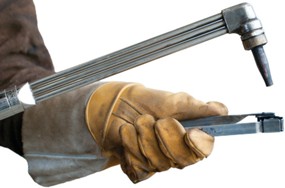
- As a safety precaution, always purge the torch and hose before igniting the flame, especially if the equipment was shut down. Flammable or explosive gas mixtures may have collected inside the torch and hose. Open each torch valve (one at a time) for 5 to 10 seconds, and then close them.
- Open the acetylene torch valve no more than a [latex]\frac{1}{2}[/latex] turn, and light the gas coming out of the tip with a striker.
- Set the striker aside and adjust the acetylene valve until the flame becomes turbulent and stops giving off black smoke (Figure 5). Another method is to slowly adjust the valve until there is a gap between the tip and the flame. The flame should be yellow-orange.
Note: Never use matches, a lit torch or burning paper to light a torch—use only a striker. Never place butane lighters near hot work.
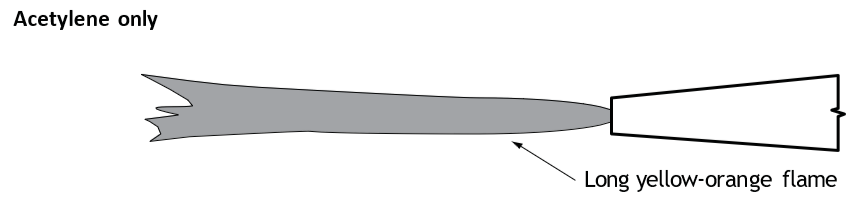
- Gradually open the oxygen torch valve and adjust it to a neutral flame. As oxygen is fed into the flame, the colour changes from yellow-orange to blue and a small, light green inner cone starts to form.
The inner cone is a fuzzy, irregular shape. As more oxygen is added, the cone becomes white, rounder and smoother. This is a neutral flame, in which acetylene and oxygen mix in the right proportion to release only heat and harmless gases. If the inner cone is pointed and the flame hisses, too much oxygen has been added. This is an oxidizing flame in which the metal being heated will burn or oxidize. A carburizing flame has too much acetylene and results in adding carbon to the metal. The flame is blue with a dark-blue, feathered inner cone. Each type of flame is used for specific applications, so it is very important to know how to produce all three flames.
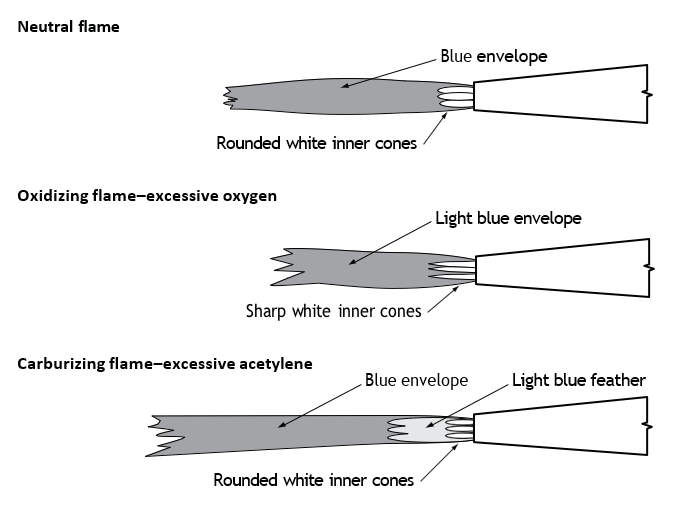
A neutral flame is the ideal flame for fusion welding and preheating steel for cutting. Temperatures range from 3075°C (5600°F) to 3237°C (5900°F) at the hottest part of the flame (the tip of the inner cone). With a neutral flame, melted steel flows easily, and the welds are clean.
A carburizing flame is used for welding white metal (i.e., aluminum) and for brazing and other applications where oxidizing the metal would cause poor welds or where lower flame temperature is required.
An oxidizing flame produces a slightly higher flame temperature than a neutral flame and is used to braze with bronze rod. If used on steel, it will burn and cause foaming and sparking of the metal.
Shutting Down
It is very important to know how to correctly shut down an oxy-acetylene outfit once the welding is completed or when you leave the work area for more than ten minutes. A mistake could result in injury to yourself and others, so follow the shutdown procedure exactly as described.
- Close the acetylene torch valve. The flame will immediately extinguish, and only the oxygen gas will flow from the tip.
- Close the oxygen torch valve. Gas is no longer leaving the welding tip, but the system is still pressurized. In this state, the torch can be left for a short period of time (10 minutes or less). When work is stopped for a longer period, such as during lunch or overnight, the pressurized oxygen and acetylene must be bled from the torch, hose and regulators.
- Bleeding the lines refers to the releasing of the gas pressure still in the system. To bleed lines, tightly close the acetylene cylinder valve first, then the oxygen cylinder valve.
- Open the acetylene torch valve. The pressure readings on both acetylene gauges will drop to “0” and you will hear what is left of the acetylene gas in the line being released from the welding tip. Never bleed the acetylene near hot metal, sparks or open flames.
- Turn the acetylene-pressure-adjusting screw all the way out (counter-clockwise) to close the regulator.
- Close the acetylene torch valve gently.
- Open the oxygen torch valve. The pressure readings on both oxygen gauges will drop to 0 and you will hear the oxygen gas being released from the welding tip.
- Turn the oxygen pressure adjusting screw all the way out (counter-clockwise) to close the regulator.
- Close the oxygen torch valve gently.
- Store the hose and torch off the floor and away from objects that might damage them. Make sure the hose is not kinked, as this could cause damage and problems with gas flow.
You are handling precision equipment that is potentially dangerous. Follow the shutdown procedure as carefully as you would follow the assembly procedure. Both operations can be hazardous unless you do them correctly.
Disassembling the Oxy-Acetylene Setup
When cylinders are empty and must be replaced, or the outfit is to be transported a long distance or stored, the oxy-acetylene outfit should be disassembled.
Never disassemble the equipment if the gauges do not read 0, the lines have not been bled, or the cylinder valves are not tightly closed.
- Disconnect the welding tip attachment from the torch handle and store the two pieces in a container free from oil or grease. Attach a fitting to the torch handle to protect the threads and seat.
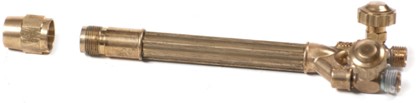
- Disconnect the hose from RFCVs on the torch handle. RFCVs may remain on the torch handle unless they need service or replacement. Store the handle and RFCVs in their proper container.
- Disconnect the hose from RFCVs on the regulators. Again, RFCVs may remain on the regulators. Coil the hose and store it in a place free from dust, oil, grease and direct heat.
- Disconnect the regulators from the cylinder valves. Carefully place each regulator with the attached RFCV in separate containers. Regulators are precision instruments and can be damaged from rough handling.
- Place protective cylinder caps over the cylinder valves and hand tighten. Even if the cylinder is empty, install the cylinder caps. Empty cylinders should be marked with the letters MT and stored separately from full cylinders.
Although an instructor will demonstrate the procedures for assembling, testing, lighting, adjusting, shutting down and disassembling the oxy-acetylene setup, carefully read and understand the sequences before you attend the demonstration. After the instructor’s demonstration, be prepared to answer questions and perform the steps as described. Do not take shortcuts, and never take safety for granted. Oxy-acetylene equipment is very dangerous if used improperly.
 Self-Test B-5.3: Use Oxy-Acetylene Equipment
Complete Self-Test 5.3 and check your answers.
If you are using a printed copy, please find Self-Test A-5.3 and Answer Key in the Appendix at the end. If you prefer, you can scan the QR code with your digital device to go directly to the interactive Self-Test.

References
BC Industry Training Authority. (2019). Piping trades apprenticeship program: Use Tools and Equipment—Level 1 harmonized [Binder]. Crown Publications, Queen’s Printer for British Columbia. https://www.crownpub.bc.ca/Product/Details/7960000261_S
Industry Training Authority. (2019). Piping trades apprenticeship program: Level 1—Competency B-4: Use soldering and brazing equipment (Sprinkler fitter). Crown Publications, Queen’s Printer for British Columbia.
Industry Training Authority. (2019). Piping trades apprenticeship program: Level 1—Competency B-5: Use cutting, brazing and soldering equipment (Plumber). Crown Publications, Queen’s Printer for British Columbia.
Industry Training Authority. (2019). Piping trades apprenticeship program: Level 1—Competency B-6: Use oxy-fuel cutting equipment (Plumber). Crown Publications, Queen’s Printer for British Columbia.
Industry Training Authority. (2019). Piping trades apprenticeship program: Level 1—Competency B-6: Use soldering and brazing equipment (Steamfitter). Crown Publications, Queen’s Printer for British Columbia.
Industry Training Authority. (2019). Piping trades apprenticeship program: Level 1—Competency B-7: Use oxy-fuel equipment (Steamfitter). Crown Publications, Queen’s Printer for British Columbia.
Media Attributions
All figures are sourced from Industry Training Authority (2019) and/or Camosun College (2019) and are used under the Creative Commons Attribution 4.0 (CC BY 4.0) licence unless otherwise noted. Images copyrighted by the BC Industry Training Authority are licensed under a Creative Commons Attribution-NonCommercial-ShareAlike 4.0 (CC BY-NC-SA 4.0) licence.
A system that uses a mixture of oxygen and acetylene gas to produce a high-temperature flame for cutting, welding, or heating metal. (Section B-5.3)
A formal safety document that gives permission to perform work that produces heat, sparks, or flames (such as welding or cutting) and confirms that proper precautions are in place to prevent fire or injury. (Section B-5.3)
A fuel gas made from carbon and hydrogen that burns very hot when mixed with oxygen and is commonly used for welding, brazing, and cutting metal. (Section B-5.1)
A flame with the right mix of oxygen and fuel so it burns clean and does not damage the metal. (Section B-5.1)
A flame with excess acetylene that adds carbon to the metal and produces a cooler, softer flame used for brazing and working with certain metals. (Section B-5.3)
A flame with too much oxygen that can cause metal to burn or become brittle. (Section B-5.2)