B-4.6 Rig Load for Cranes
Cranes are mechanical hoisting equipment designed to lift, move, and land a load deemed too heavy to move safely by hand. The potential of modern cranes is immense, with some having a capacity in the hundreds of tons. As a tradesperson, it is important to be familiar with the many different types of cranes and derricks, and to understand how to select the appropriate crane to perform a hoist safely and effectively.
If you are working with a crane, your responsibilities include the following:
- Use safe behavior around a crane.
- Be able to identify basic crane components and types.
- Ensure the crane site is safe and ready for use and that the landing spot or lay-down area is ready for the hoisted load.
- Ensure the load is stable.
Industry employs cranes to move everything from bundles of pipe to sections of buildings, from vehicles to personnel. Because of the potential for catastrophic consequences when a lift goes badly, crane operations and crane components are heavily controlled and regulated. OHS Regulations, Part 15: Rigging describes minimum safety standards, referring to Canadian Standards Association (CSA), American National Standards Institute (ANSI), and American Society of Mechanical Engineers (ASME) standards for the design, inspection, maintenance, and repair of all cranes.
Describe Crane Procedures
Crane Component and Terms
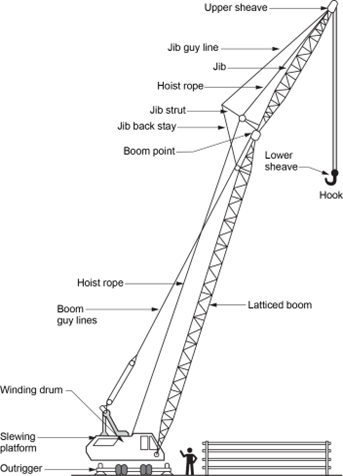
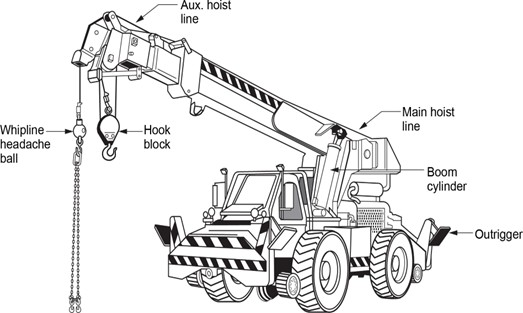
Block: A collection of sheaves that provide a mechanical advantage in a lift. Blocks are often found at the hook.
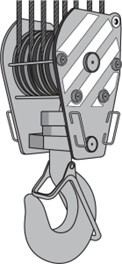
Boom: The primary arm of a crane. It acts as a lever and positions the block and hook directly above the load.
Boom cylinder: The hydraulic control of a boom.
Boom radius: Also referred to as the operating radius, this is the horizontal distance from the centre of rotation to the hook and is a function of boom angle and length. This concept is crucial to understanding safe crane capacity.
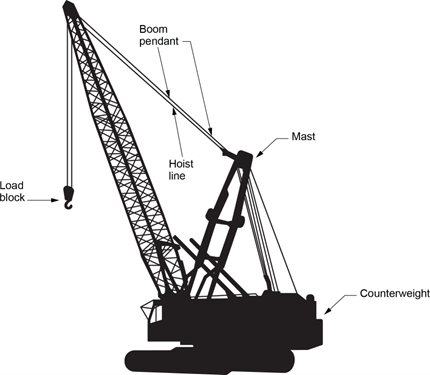
Counterweight: A supplementary ballast added to the weight of a crane to provide additional stability during a lift.
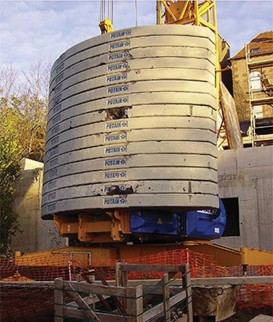
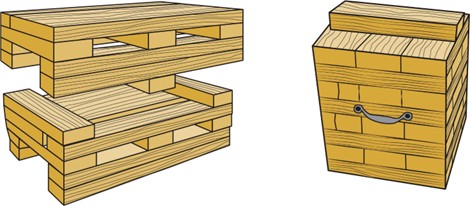
Cribbing: Material used for dunnage or blocking under a load to allow for the attachment and removal of rigging.
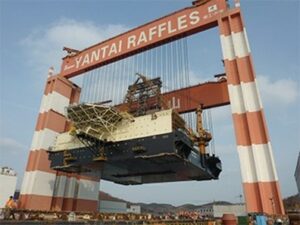
Gantry: A fabricated structural, bridge-like crane operating on tracks or wheels at or near ground level.
Headache ball: A crane hook, generally without a block.
Hoist line: The wire rope that controls the main block, jib block, or hook.
Jib: A secondary arm of a crane, used to extend the boom for specific lifts.
Lashing: An arrangement of wire rope and securing hardware such as U-bolt clips, used to secure two or more objects together. It is often used to temporarily secure a load, prior to a hoist.
Load chart: Manufacturer’s documentation or literature that describes a crane’s lift capacity under all possible operating configurations.
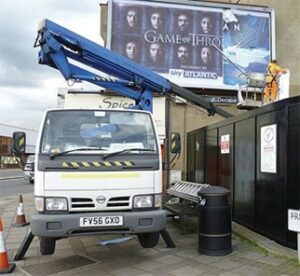
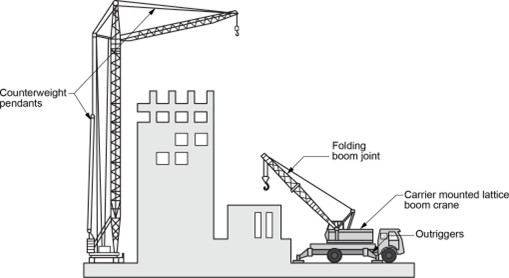
Outrigger: A support member that projects beyond the natural outline of a crane to provide additional support and to prevent toppling.
Pendant: Also called a stay, a supporting line that maintains a constant distance between two points of attachment, such as a counterweight and a gantry or mast.
Sheave: A grooved wheel or pulley used to redirect force along a hoist line.
Side-loading: A dangerous condition in which a portion of a crane hoist acts horizontally, placing force on the boom other than the true vertical lift that the boom is designed for.
Swing: The hazard area associated with the swing radius of the crane’s carrier and counterweights. This area should be flagged off during crane operation and considered a no-go zone.
Tagline: Guy wires used to control crane loads and prevent unwanted rotation or swinging, allowing ground workers to control the load from a safe distance.
Whipline (auxiliary hoist): A secondary hoist line from the main hoist, usually lighter and faster.
Crane Selection
There is an incredible variety of cranes, so crane selection must consider a number of factors, including:
- Weight, shape and size of the load. Important: include all slings, spreaders, other lifting equipment used, and hook block in load weight calculations. Consider anything below the boom tip as load.
- Lift parameters, including boom or operating radius and height
- Number of lifts required
- Required mobility of the crane
- Site and terrain conditions
Crane Identification
You will find crane identification and user information permanently attached to the crane. Clear identification of all detachable components such as the boom, jib, counterweight, etc., indicates that these components are connected to that particular crane. In addition, permanently affixed, easily located, and clearly written capacity rating charts, or load charts, are required. These describe safe capacity loads at permissible boom lengths and angles. For example, a crane may have a capacity of 110 tons, but this capacity decreases as the boom extends or moves closer to horizontal. This information is provided in the rated capacity literature.
Industry categorizes cranes by lift capacity (rated in tons), boom style, and mobility.
Boom Style
- Telescoping
- Lattice
- Fixed
- Articulating
Mobility
- Rough terrain
- Crawler
- Truck mount
- Carrier mount
- Tower, stationary
- Tower, rail mounted
Ensure the load is stable whenever you are lifting loads with a crane. Start the initial lift very slowly, watching the load for any signs of tilting or shifting. If the load tilts more than 5°, lower the load and rearrange the rigging.
Load Chart
Load chart, shown below, informs the user of a crane’s safe capacity in all permissible configurations of boom lengths and angles, base conditions, load radius, boom point elevation, and whether outriggers are used or not. The boom angle refers to the angle of the boom to the horizon. The load radius describes the measurement from the crane centreline to load centre at its most distant. The boom point elevation describes the distance from the ground to the centre of the outermost part of the boom. The tern outriggers describes equipment attached to the base of a crane designed to increase the base area and provide a great deal more stability, especially when the load is to the side of the crane.
Typically, as the boom lowers and approaches horizontal, and the centreline of the lift moves away from the centre of the crane, crane capacity diminishes. This is termed the load radius. When describing a 100-ton crane, this capacity rating describes the safe capacity with the boom near vertical or the minimum boom radius and the load directly to the rear of the crane with little to no swing.
Carrier Mounted Lattice Boom
|
Boom length |
Radius |
Boom angle |
Side pick- up, no outriggers |
Rear pick- up with outriggers |
Side pick- up with outriggers |
Rear pick- up with outriggers |
|
50 m |
8 m |
83° |
32,226 kg |
39,975 kg |
99,135 kg |
99,135 kg |
|
50 m |
15 m |
75° |
17,670 kg |
18,656 kg |
39,970 kg |
47,261 kg |
|
50 m |
45 m |
27° |
1,875 kg |
2,125 kg |
7,305 kg |
10,156 kg |
Crawler Mounted Lattice Boom
|
Boom Length |
Radius |
Boom Angle |
Boom Point Elevation |
Crawlers retracted |
Crawlers Extended |
|
21m |
4.8 m |
80° |
23 m |
177,968 kg |
181,600 kg |
|
21m |
21m |
19.5° |
9.2 m |
21,247 kg |
23,880 kg |
Note the extreme differences in load capacity as crane conditions change in the tables above. There may also be additional charts included to account for added counterweights.
Site Preparation
The crane operator, project engineer, or supervisor will select and oversee site preparation for a selected crane. Your involvement in this could involve any of the following tasks:
- Assess access roads in the area.
- Assess whether there is sufficient space to assemble the crane, if necessary.
- Level and compact the site.
- Identify and account for powerlines, and power down (de-energize them), if necessary
- Identify and make provisions for trenches, shoring, buried utilities, etc.
- Restrict public access and set up a perimeter using safety ribbon or barricades.
- Ensure proper clearances for the crane’s swing radius.
- Provide outrigger mats and cribbing for soft ground conditions. Cribbing is material used for dunnage under a load to allow for the attachment and removal of rigging.
- Prepare a lay-down area for the load. This may include dunnage or other site preparation.
Certain conditions may require extra precautions, including avoiding the leading edge of a trench, underground sewer mains, and ground beside recently constructed buildings that may have uncompact backfill. If in doubt, consult a soil engineer.
Outriggers require mats that are at least three times larger in area than the floats and should be rigid and rated for the load. Never block the arm of an outrigger, only the float. Bearing mats can be made of wood or steel and offer more stability than native soil.
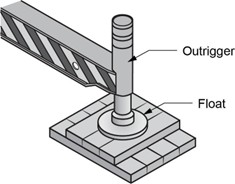
Once the crane is in place, perform a walk-around, paying particular attention to overhead hazards and crane support.
Crane Leveling
Cranes require a level base. Most safety standards require a grade of 1% or less, with some manufacturers requiring [latex]\frac{1}{2}[/latex]%. A 1% grade means a base with a length of 20 feet or 240 in. may only have an elevation change of 2[latex]\frac{3}{8}[/latex]in. from one end to the other. This requirement prevents side-loading on the boom, a condition where force is applied to the boom at an angle, which the boom is not designed to withstand. The IPT Crane and Rigging Training Manual shows that a short-boom crane at the minimum hoist radius can lose 10% of its capacity for every 1% angle of side-load.
Level a crane with calibrated measuring tools, such as a four-foot carpenter’s level or the bird’s-eye levels found in the crane’s cab.
After levelling the base, check the crane’s level using the following method: raise the boom to its highest angle and hoist a small, compact load just off the ground. The hoist line should fall within the centreline of the boom. Do this for each of the four quadrants: front, side, and corners. If the hoist line is outside the boom, the crane is not level. This method is less accurate in windy conditions.
Secure Load for Rigging Attachment and Removal
Once the chosen crane is in place, a lift plan has been completed, and the crane site has been prepared, the worker can prepare for the lift. Preparation of a load before and after a hoist requires an understanding of proper material handling and a familiarity with hoisting and jacking equipment. Pipe trades workers need to learn the safety precautions required to prepare material and equipment prior to a lift, and to safely remove rigging equipment once the lift is complete.
Pre-Hoist Preparation
OHS Regulation 15.2 states: “Rigging and slinging work must be done by or under the direct supervision of qualified workers familiar with the rigging to be used and with the code of signals authorized by the Board for controlling hoisting operations.”
At this point, a trained and qualified individual should have established the weight of the load, confirmed the distance, height, and swing of the lift, and selected the appropriate tackle and hardware.
To prepare a load for hoisting, the load must be on dunnage or cribbing to allow for the application of slings or other approved hoisting equipment. If necessary, jack or pry the load and position cribbing beneath it. Distribute the weight evenly on the cribbing while leaving enough vertical clearance to apply the rigging equipment. This process creates a high risk of pinching injuries. Remember: never place any part of your body under a load!
At this point, if the load is not accessible to the crane hook, use appropriate equipment to move or position the load across the floor. Some options include:
- Roller jacks, steel dollies, air castors, or skates
- A forklift or pallet jack
- A chain fall, come-along, or chain hoists
Rig the load while it is supported by cribbing or dunnage. Always rig using the appropriate slings and equipment, and never wrap the hoist rope directly around the load.
Apply the rigging equipment with the centre of gravity (C of G) identified. The centre of gravity will always move directly under the hook when lifted, so anticipate load swing or shifting. Consider using a turnbuckle or come-along at the hook to help centre and balance the load beneath the hook. Test the load by lifting it approximately one foot. If the load is more than 5° off level, lower the load and re-rig.
Attach taglines to adequately control swing and load rotation. Ensure that taglines are made of non-conductive material to reduce the risk of electric shock. Taglines should be long enough to allow workers to control the load from a safe distance. Use more than one tagline if necessary. Remove taglines after the lift is complete and the load is in its final position.
Post-Hoist Procedures
OHS Regs 15.3 states, “Loads to be unhooked by a worker must be safely landed and supported before the rigging is detached.”
This may mean lashing the load to a structural member or landing the load on prepared cribbing before releasing the hook.
Consider what will happen next. Is the load in the correct location, or will you need to rig it across the floor? Is the lay-down area sufficiently clear and ready? Is the load a piece of equipment that must be accurately placed on a pad? Be sure you are satisfied with the position of the load before removing the hook.
 Self-Test B-4.6: Rig Load for Cranes
Complete Self-Test 4.6 and check your answers.
If you are using a printed copy, please find Self-Test A-4.6 and Answer Key in the Appendix at the end. If you prefer, you can scan the QR code with your digital device to go directly to the interactive Self-Test.

References
BC Industry Training Authority. (2019). Piping trades apprenticeship program: Use Tools and Equipment—Level 1 harmonized [Binder]. Crown Publications, Queen’s Printer for British Columbia. https://www.crownpub.bc.ca/Product/Details/7960000261_S
The competencies Use hoisting, lifting and rigging equipment and Rig loads for cranes (our sections B-4.5 and B-4.6, respectively) align with, and are adapted from, the Piping Trades Apprenticeship Program: Use Tools and Equipment—Level 1 Harmonized curriculum (Industry Training Authority, 2019). See: SkilledTradesBC. (2025). Plumber program outline (harmonized). https://skilledtradesbc.ca
WorkSafeBC. (n.d.). Occupational health and safety regulation: Part 15—Rigging. https://www.worksafebc.com/en/law-policy/occupational-health-safety/searchable-ohs-regulation/ohs-regulation/part-15-rigging
WorkSafeBC. (n.d.). Occupational health and safety regulation: Part 15—Rigging, s. 15.2 Qualified riggers. https://www.worksafebc.com/en/law-policy/occupational-health-safety/searchable-ohs-regulation/ohs-regulation/part-15-rigging#SectionNumber:15.2
Media Attributions
All figures are sourced from Industry Training Authority (2019) and/or Camosun College (2019) and are used under the Creative Commons Attribution 4.0 (CC BY 4.0) licence unless otherwise noted. Images copyrighted by the BC Industry Training Authority are licensed under a Creative Commons Attribution-NonCommercial-ShareAlike 4.0 (CC BY-NC-SA 4.0) licence.
- Figure 2 Potain tower crane2-Counterweight [Counterweights] by Cjp24 on Wikimedia Commons is licensed under the a CC BY-SA 3.0 license.
- Figure 4 GTAISUN with SCARABEO [Gantry crane], by Haakman on Wikimedia Commons is used under a CC BY 3.0 license.
- Figure 5 Replacing an advertising poster in London using an articulated platform 01 [Boom truck with outriggers] by Philafrenzy on Wikimedia Commons is licensed under CC SA 4.0