B-4.4 Select Slings and Tie Knots, Bends, and Hitches
Natural and Synthetic Ropes
Fibre rope may be made from either natural or synthetic fibres. Natural fibres include manila and sisal. Synthetic fibres include nylon, polypropylene, and polyester. Each of these fibres has unique properties. Fibre ropes are not the same as fibre slings, which are specifically designed and manufactured for lifting. Fibre slings are designed and commercially fabricated for lifting purposes and have their safe working load indicated on a tag sewn to the sling.
Stranding
The individual fibres in ropes, whether natural or synthetic, are relatively weak. Fibre ropes become strong only when many hundreds of these fibres are woven or twisted into strands.
Braided Rope
Braided ropes are generally made from synthetic materials. A braided rope has no inherent twist to it making it easy to handle. This type of rope consists of several strands of braided yarns, one inside the other.
Twisted Rope
The traditional fibre rope consists of three strands twisted together. The strands twist in a clockwise direction. Each strand is made up of many smaller strands called yarns, and each yarn is made of even smaller strands called fibres. The yarns within the strands are twisted counterclockwise, while the fibres within the yarns are twisted in a clockwise direction. By alternating the twist direction at each layer, the rope remains stable under load because the fibres stay relatively straight.
A twisted synthetic rope is preferred for lifelines because it stretches slightly, helping to cushion a worker’s fall.
Natural Fibre Ropes
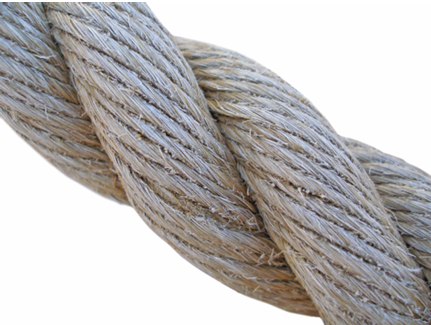
Manila
Manila rope is available in six grades and is not as strong as synthetic rope. As grade and strength decrease, the colour darkens.
|
Grade |
Description |
|
Yacht rope |
Considered the highest quality manila rope, yacht rope is pale yellow in colour. It is expensive and therefore used only on special jobs. |
|
Bolt rope |
This is a high grade, pale yellow rope. In strength, it falls between yacht rope and No. 1 grade. |
|
No. 1 grade |
No. 1 grade is light yellow and usually contains one or more coloured strands as identification. It is the lowest grade suitable for overhead lifting. |
|
No. 2 grade |
This type is slightly darker than No. 1 rope and does not have coloured identity strands. It loses strength more rapidly than No. 1 grade. |
|
No. 3 grade |
Considerably darker than either No. 1 or No. 2 grade, No. 3 loses strength very rapidly when in service. |
|
Hardware store rope |
This is the darkest and poorest grade of manila rope. Since it is constructed with a high percentage of short fibres, it has little strength, a short life, and a much rougher texture with many fibre ends sticking up from the surface. |
Sisal
Sisal rope is white, coarse-textured, and rough to the touch. It is weaker than manila and should be used only when cost is more important than strength.

Natural fibre rope must not be used for hoisting with a powered hoist.
Synthetic Fibre Ropes
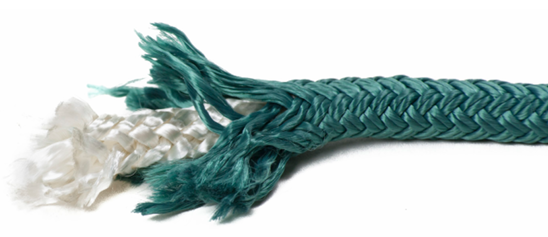
Nylon
Nylon is approximately 2[latex]\frac{1}{2}[/latex] times stronger than manila. Nylon rope is usually pure white, soft, pliable, and smooth to the touch. It has an elastic quality and can stretch up to 40% of its length.
Nylon rope loses about 10% of its strength when wet but regains its original strength when dried. Nylon does not rot, is unaffected by mildew, and can withstand temperatures up to 150 °C (300 °F) without being damaged. It is adversely affected by acids and alkalis and can be damaged by them.
The highly elastic nature of nylon rope makes it capable of withstanding repeated shock loads. However, this same elasticity can be problematic if you are trying to lift loads in areas with restricted headroom.
Polyester
Polyester rope looks similar to nylon but is less elastic. It stretches only about 5% before breaking.
Polyester rope is 87% as strong as nylon. It is not as elastic as nylon and is capable of sustaining only 60% of nylon’s shock load.
Polyester does not lose any strength when wet and, unlike nylon, is unaffected by acids or alkalis. For your own protection, however, you should wash polyester ropes and slings with cold water whenever they have been exposed to any chemicals.
Polypropylene
Polypropylene rope is available in a wide range of colours, but yellow is the most common. It is smooth, somewhat slippery, lightweight, and floats on water.
Polypropylene gradually softens as temperatures increase and loses up to 40% of its strength at boiling water temperature (100 °C or 212 °F). Higher temperatures will eventually cause polypropylene to melt. This rope also deteriorates rapidly when exposed to sunlight.
Polypropylene rope is about 60% as strong as nylon and is capable of absorbing only 40% of the shock load of nylon. Of all the rope types mentioned, polypropylene has the best electrical insulating properties against electrical shock, but it should be noted that only dry ropes should be used near sources of high voltage.
Working Load Limit (WLL)
The working load limit (WLL) is the maximum load that a rigging component may carry while meeting the safety factors set forth by workplace regulations.
Most regulations set minimum safety factors for rigging materials. The WLL is typically determined by dividing the breaking strength of the rigging component by the safety factor.
The minimum safety factor for rigging used to support workers is 10. For lifting materials, the safety factor varies depending upon the rigging component. For example, lifting materials with a sling made of nylon fibre rope requires a safety factor of 9, while for an alloy chain the factor is only 4.
Breaking Strength
Breaking strength is the minimum force required to break a rope, measured in Newtons (N) or pounds.
The strength of different ropes depends on the fibre being used, the diameter of the rope, and the type of stranding, that is used. For equal diameter and stranding, the strongest of the commonly used fibre rope is nylon. Polyester and polypropylene are weaker than nylon, but other conditions may make them a better choice.
For the exact breaking strength of a specific rope it is best to consult the manufacturer of the rope.
Use of Ropes
Fibre ropes are very useful in construction. They are easy to handle and, because they come in very long lengths, they can readily be adapted to many custom situations.
It is very important to use the correct knot, bend, or hitch when connecting ropes together or to material to be lifted. If the incorrect knot is tied, it may slip, causing the load to fall or jam, and may permanently damage the rope.
New fibre bulk ropes come packaged in a plastic wrapper. To remove new rope from its shipping coil, place the coil on its side, reach down inside and pull the rope up from inside the coil. Leave the outer wrapping intact.
Remember: Tying a knot reduces rope strength by approximately 50%.
Safe Use Guidelines
Ropes should not be overloaded. Ropes that have been subjected to loads beyond their working load limit should be taken out of service. For lifting materials, the maximum load should never exceed [latex]\frac{1}{9}[/latex] the of the rope’s breaking strength.
Avoid exposing rope to direct sunlight for long periods of time. Excessive exposure causes fibres to break down due to ultraviolet rays.
Do not use frozen rope. If you must handle rope that is frozen, do so very carefully, as bending may break the strands. To prevent rope from freezing, dry it well before exposing it to cold weather.
Avoid making sharp bends in rope. Sharp bends, including those made by knots, will reduce the rope’s strength by 50%. Always pad the sharp corners of a load before applying the rope.
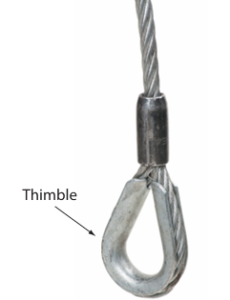
When attaching a small-diameter object such as a hook or ring to a rope, use a thimble to protect the eye of the rope.
Care and Maintenance of Rope
The life of any type of fibre rope can be greatly extended if you follow the basic care and maintenance procedures listed below.
Whipping
Whipping is a wrapping applied at the end of a rope to prevent the rope strands from unravelling. Whenever a rope is cut to a new length, the ends of the rope should have whipping applied before the rope is put into service.
Whipping is more than just a tidy decoration. It prevents the strands of the rope from slipping in relation to each other. Such slipping would cause one strand to carry more or less than its fair share of the load.
To apply whipping to a rope, use a strong, non-slipping twine. If the twine tends to slip, pulling it over soft tar, beeswax or pine pitch will usually correct the problem.
Tape may be used as whipping if applied tightly. Whipping should be replaced when it shows signs of fraying or loosening.
How to Apply Whipping
- Begin by holding one end of the twine (A) at the end of the rope. Then form a long loop along the rope.
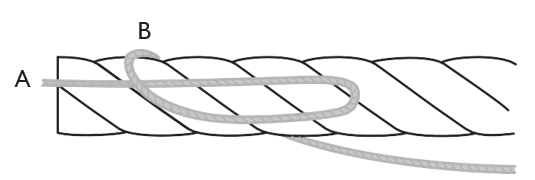
- Hold the end of the twine (A) and the left end of the loop with your left hand and begin wrapping the other end of the twine (B) around the rope over the long loop.
- Continue to apply wraps as close to each other and as tight as possible until you have covered a distance approximately 1[latex]\frac{1}{2}[/latex] times the rope diameter.
- Take the twine end (B) and pass it through the loop as shown here.
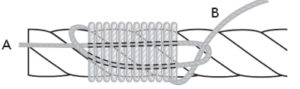
- Pull on the twine end (A) until you feel that the two ends of the twine are approximately midway under the whipping.
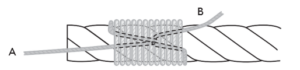
- Trim the end of the twine as close as possible to the whipping; then trim the end of the rope so that a portion approximately half the rope’s diameter projects beyond the whipping.
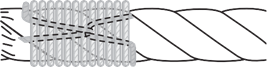
Instead of using whipping on nylon, polyester or polypropylene ropes, you can melt the fibres together with a hot iron or flame. Roll the end of the melted rope between two flat surfaces (scraps of wood) while the rope cools; otherwise, the end may become larger than the rope’s diameter. When the ends of the rope are larger than the rope diameter, they become difficult to untie.
When you are using the hot iron or flame to melt the rope fibres, be careful to avoid burning yourself.
Storage
Rope should be kept clean. Soil embedded in the fibres acts as an abrasive, wearing the rope down. Soiled rope should be washed in cool water, loosely coiled, and hung in a well-ventilated area to dry before storage. Apart from this cleaning, rope requires very little maintenance.
Be sure to coil rope when you are preparing it for storage. The coiled rope should then be hung on large diameter pegs in a cool, dry room with good air circulation to prevent mildew. Improper storage of fibre rope leads to rot, brittleness, crushed fibres, kinks, and many other defects. Any kinks or small loops should be carefully removed before the rope is put under tension and pulled taut.
With basic care and proper storage, natural fibre rope will provide many years of service. If left lying on the ground in a damp environment, the rope will become useless in a very short time.
A thorough, visual inspection should be done before performing every lifting task. When inspecting fibre ropes, look for:
- Broken strands
- Wear and abrasion
- Heat damage or melting
- Contamination with petroleum products, which can damage the rope
- Evidence of rot or damage from exposure to the elements
- Crushing, twisting, or kinking
- Loose, broken, or damaged thimbles
Note: Any damage will affect the lifting capacity of the rope.
Tying Knots and Hitches
To use rope effectively, you must be able to select the correct knot, bend, or hitch for the task and tie it properly. Any knot, bend, or hitch must support the load imposed on it, be quick and easy to tie, and be easy to untie once the load has been removed.
Rope Work Terms
To better understand the following instructions on knot tying, you will need to identify the parts of a rope.
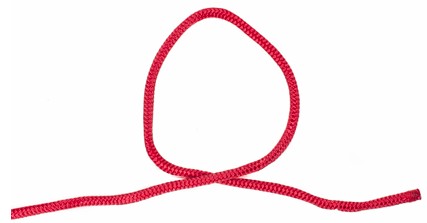
Figure 6 shows an overhand loop. A loop is the starting point for most knots. The portion of the rope that forms the loop is termed the “bight.” The long portion of the rope is termed the “standing part.” The end of the rope is called just that, the “end.”
An overhand loop is formed by passing the end of the rope over or in front of the standing part of the rope. (Figure 10).
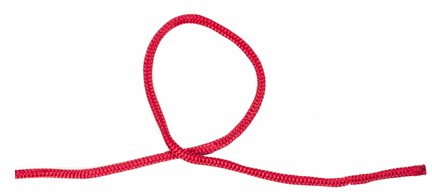
An underhand loop is formed by passing the end of the rope under or behind the standing part (Figure 11).
General Rules for Tying Knots, Bends, and Hitches
Bowline Knot
The bowline knot forms a non-slip loop at the end of a rope. It is strong, secure, and easy to untie—even after being loaded.
The bowline is used when a slip-proof loop is needed, such as when attaching a rope around a fixed object.
How to Tie a Bowline
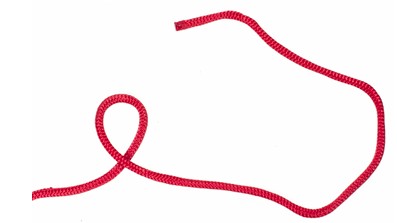
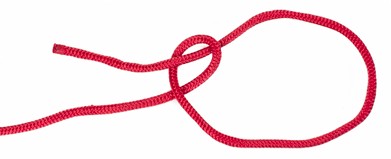
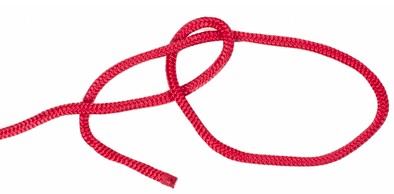
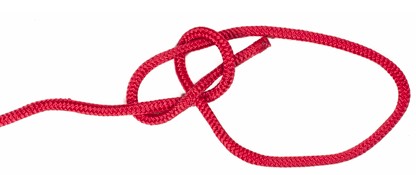
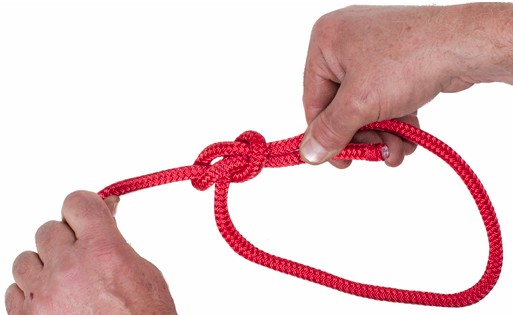
To untie the bowline, loosen the knot by pushing the loop that surrounds the standing part away from the knot. Once the knot is loosened, it is easily untied.
Bowline on a Bight
The bowline on a bight is a knot that creates two fixed-size loops in the middle (or bight) of a rope. Its advantages are that its loops do not slip and it is also reasonably easy to untie after being exposed to a strain. This knot can be used to provide a toe hold in the middle of a rope or to make an emergency Bosun’s chair (a device used to suspend a person from a rope to perform high work).
How to Tie a Bowline on a Bight
Start by creating a bend in the middle of the rope to double it (the doubled end now acts as the rope’s “end”). Form an overhand loop.
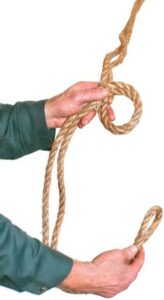
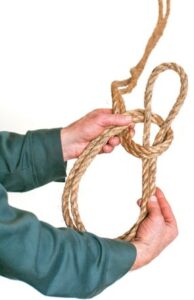
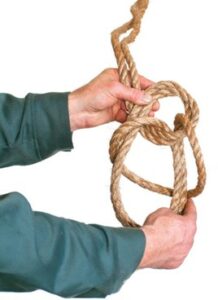
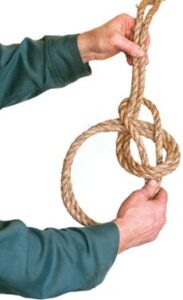
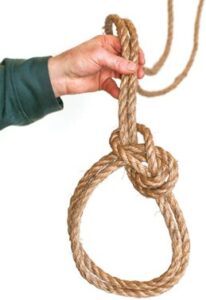
Figure 11 (Steps 1-6) Tying a bowline on a bight (BC Industry Training Authority, 2019). CC BY-NC-SA 4.0
Reef or Square Knot
The reef knot or square knot is used to fasten together two ropes of equal diameter.
How to Tie a Reef Knot
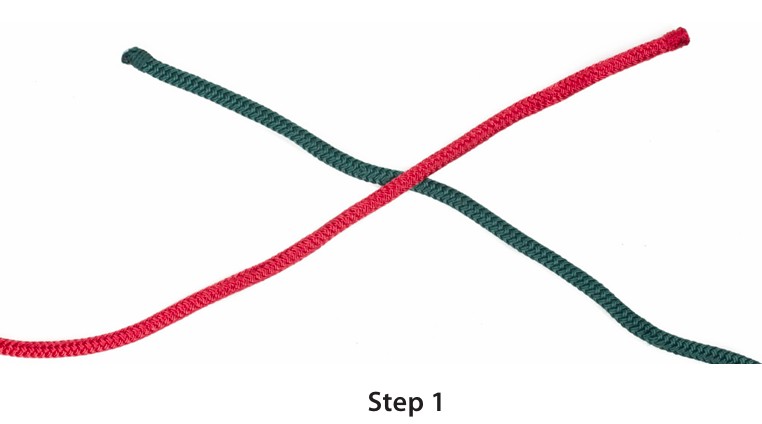
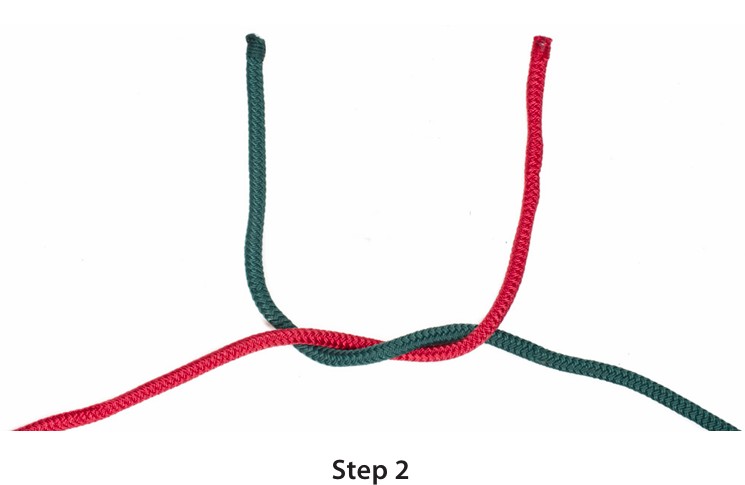
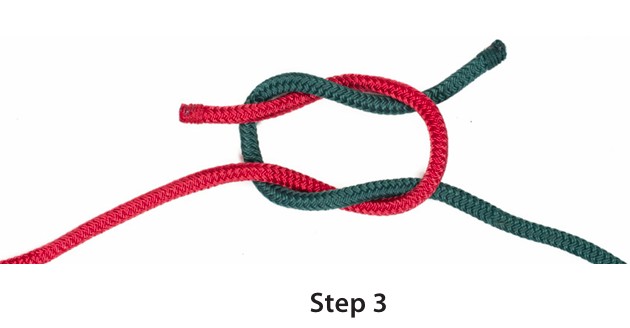
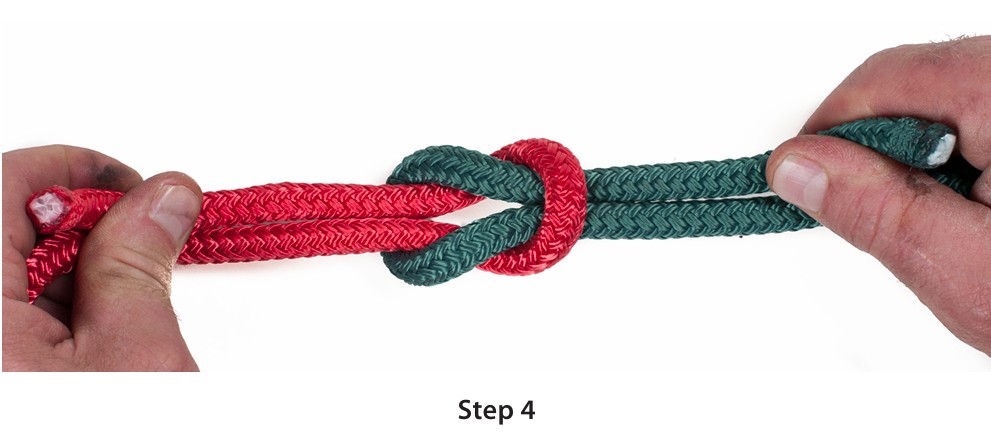
You can remind yourself how the reef knot is tied by using the following verse:
Left over right and under
— then —
right over left and under
The finished reef knot should have both the standing part and the end of each rope on the same side of the bight formed by the other rope.
Sheet Bend
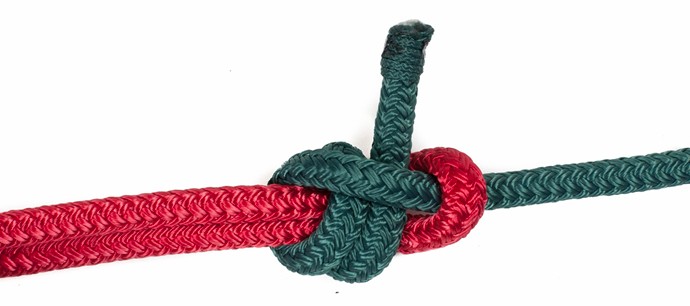
The sheet bend is used to attach two ropes of unequal diameter together.
How to Tie a Sheet Bend
- To tie the sheet bend as shown, form a bight in the larger diameter rope.
- Pass the end of the smaller diameter rope up under and through the bight; wrap it around the back of the bight’s end and standing part of the larger rope.
- Pass the end under the section of the smaller rope where it first came through the bight and continue with the small end until it lies across the top or face of the bight formed by the larger rope.
- Hold both the standing part and the end of each rope in each hand and pull in opposite directions to tighten.
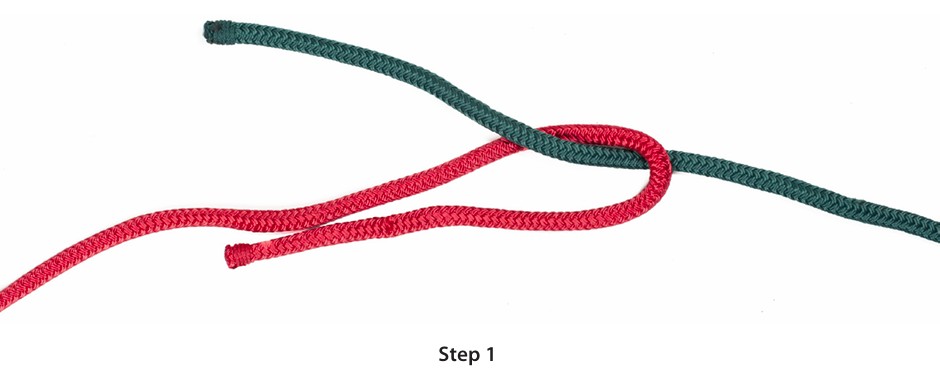
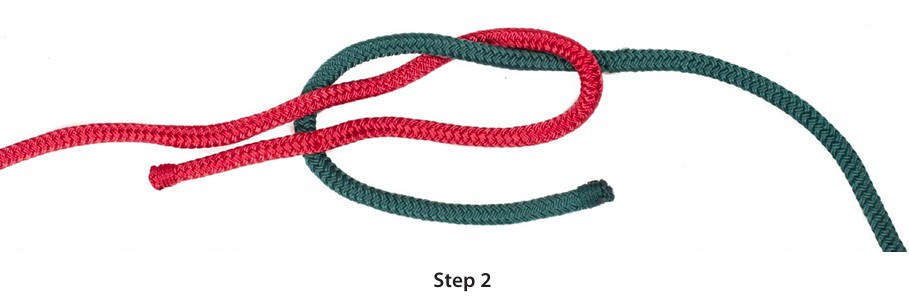
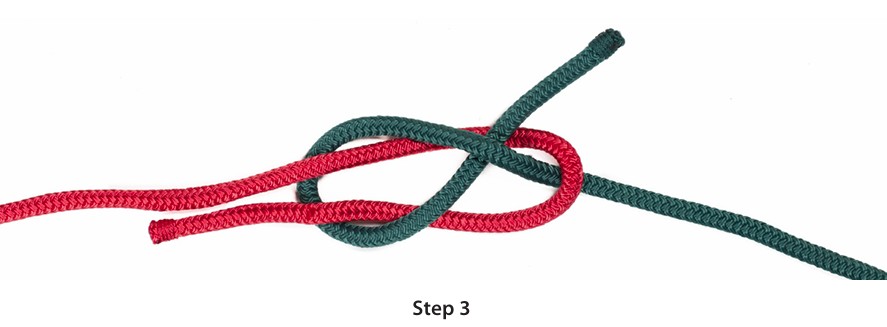
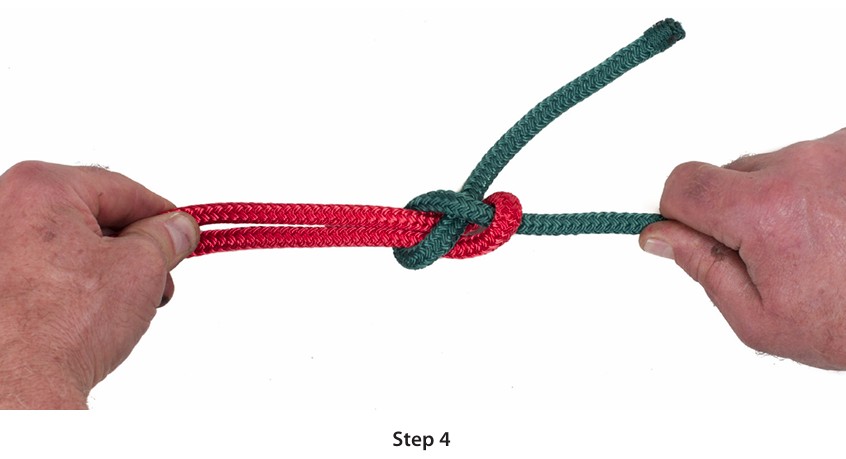
Figure 13 (Steps 1-4) Tying a sheet bend (Camosun College/BCcampus). CC BY-NC-SA 4.0
For additional holding strength, pass the running end around and under the bight an second time to create a double sheet bend.
Round Turn with Two Half-Hitches
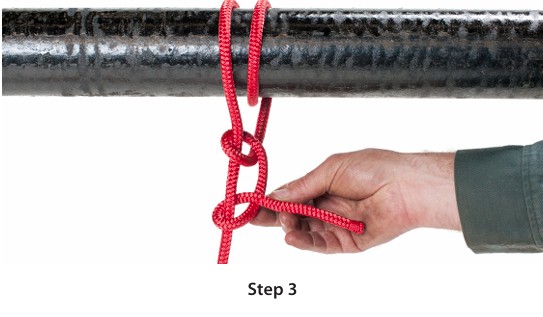
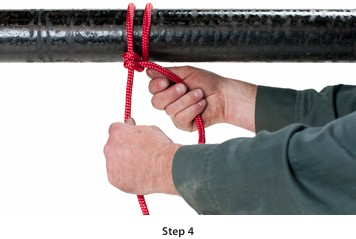
The round turn and two half-hitches is a hitch used to secure the end of a rope to a fixed object. The name refers to the components used to form the knot: A round turn wraps the rope around the object (completely encircling it), and the two half-hitches secure the end around the standing part.
How to Tie It
- To make this round turn with two half-hitches, you must as mentioned wrap the rope completely around the object (a full round turn).
- Pass the end of the rope around the standing part and pull the end between the object and the rope to form the first half hitch.
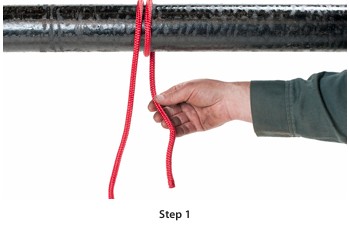
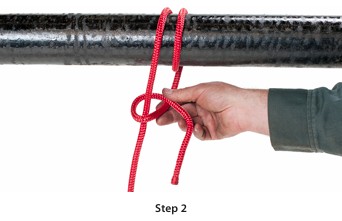
- Make a second loop around the standing part of the rope in the same direction as the first loop. (If one loop is clockwise and the other is counter-clockwise, the hitch will be difficult to untie.)
- Finish by passing the end of the rope between the standing part and the two loops. As the standing part is pulled tight, the loop around the object will slip until the two half-hitches have jammed tightly to the object. They will not come untied if the pull on the standing part is relaxed.
Rolling Hitch
The rolling hitch is a knot used to attach a rope to a rod, pole, or other rope. A simple friction hitch, it is used for lengthwise pull along an object rather than at right angles. The rolling hitch is designed to resist lengthwise movement for only a single direction of pull.
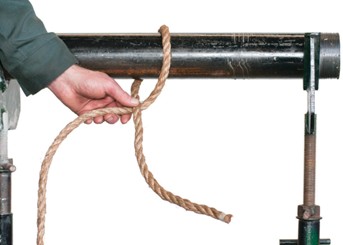
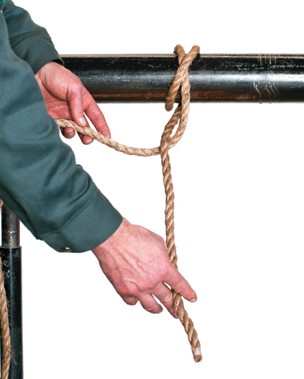
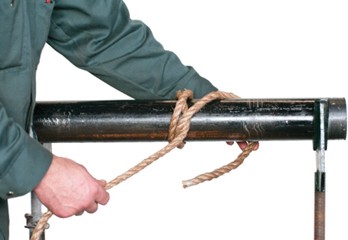
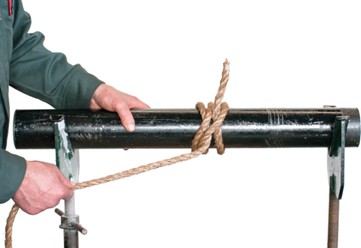
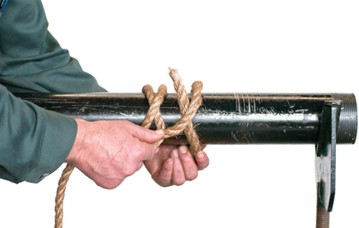
Figure 16 (Steps 1-5) Tying a rolling hitch (BC Industry Training Authority, 2019). CC BY-NC-SA 4.0
Clove Hitch
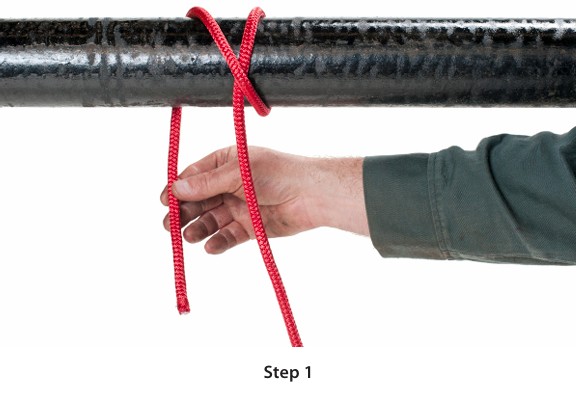
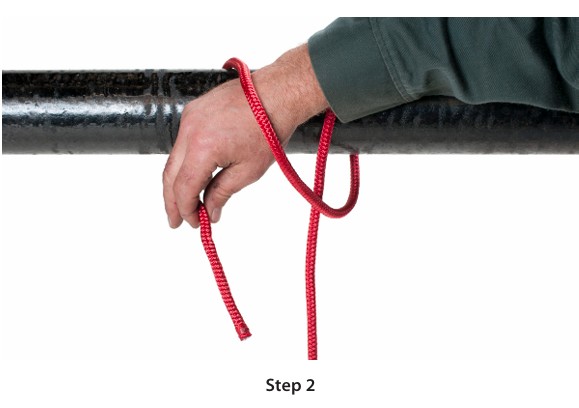
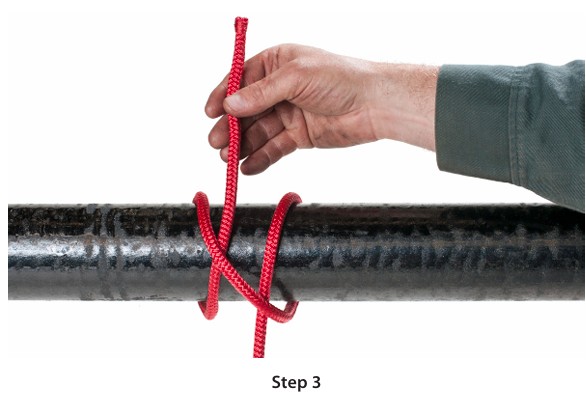
The clove hitch is used to secure a rope to a fixed object, such as a post.
How to Tie a Clove Hitch
- Wrap the rope around the object once, with the wrap passing to one side of the standing part.
- Make a second wrap around the object, this time passing to the opposite side of the standing part.
- Pass the end of the rope between the object and the second wrap.
- Pull the two wraps together and tighten by pulling the standing part and the end in opposite directions.
Note: The clove hitch can be made even more secure by tying the end to the standing part with a single half-hitch.
Timber Hitch
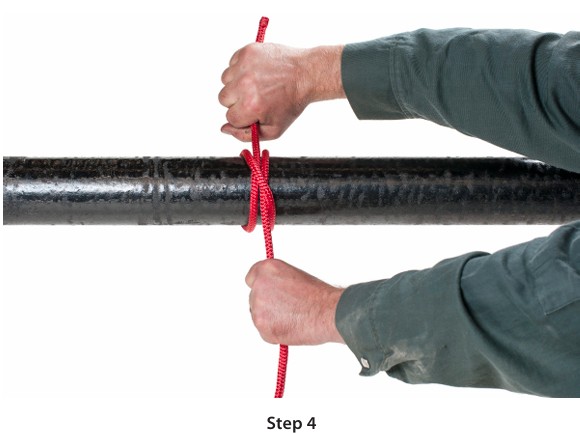
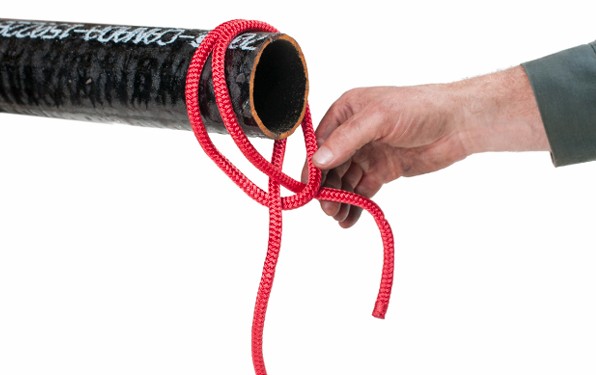
The timber hitch is used to secure a rope to a plank, timber, post, or pipe when the object must be lifted in an upright position. The timber hitch is a series of modified half-hitches.
How to Tie a Timber Hitch
- Wrap the rope around the object with an overhand loop and tie a single half-hitch around the object. (Steps 1 and 2)
- Pass the free end of the rope between the object and rope two more times.
- Pull the hitch tight by pulling the standing part of the rope at 90° to the object.
- Using the standing part of the rope tie one or more half-hitches along the length of the pipe or object to make the pipe secure and allow it to be hoisted vertically.
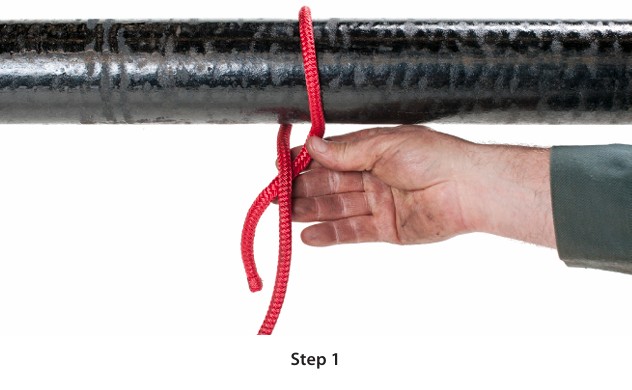
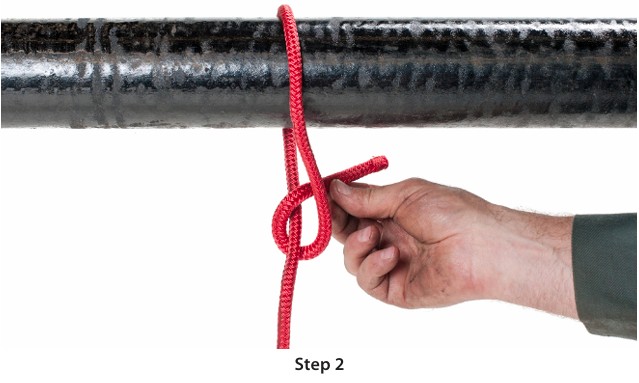
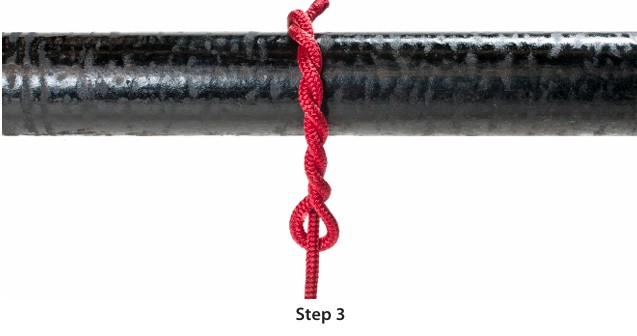
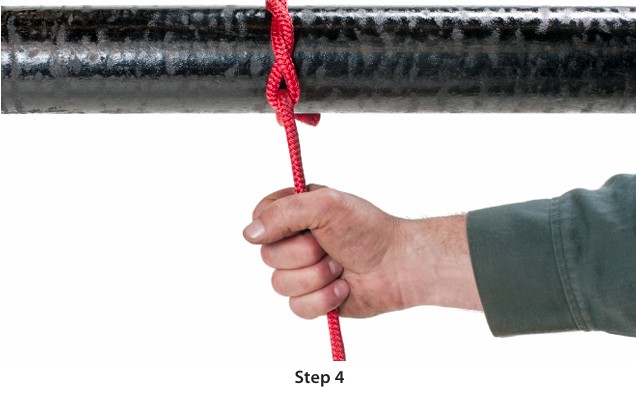
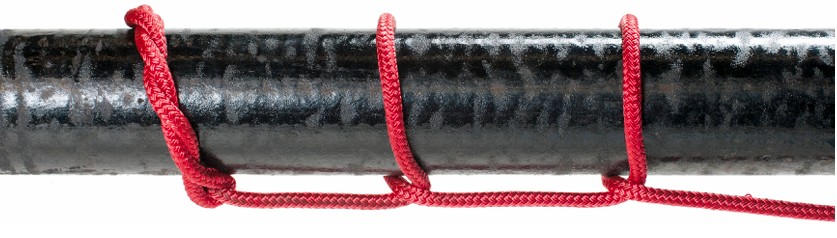
Figure 19 (Steps 1-5) Tying a timber hitch (Camosun College/BCcampus). CC BY-NC-SA 4.0
Trucker’s Knot (or Trucker’s Hitch)
The trucker’s knot is a very useful knot for tying loads down. The knot forms a slip-resistant loop that acts like a pulley in a system. You can generate almost three times as much tension on a rope using the trucker’s knot as you would if you just pulled on a straight rope.
You may find this video Truckers Hitch by Camosun College (2022) helpful.
How to Tie a Trucker’s Knot
- Form a small loop in the rope and twist the loop formed by the bend three times.
- Take a bend in the standing (dead) end and pass this new doubled bend through the loop formed by the three twists to form a second loop. This second loop becomes your “pulley” used to apply tension to the rope tying down your load.
- Pass the dead end of the rope through a tie‑down point or hook on the truck, then through the second loop formed by the trucker’s knot.
- Pull to apply tension, then secure with a double half‑hitch.
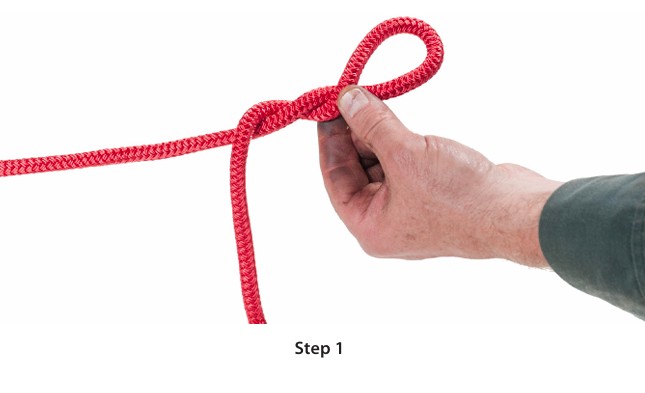
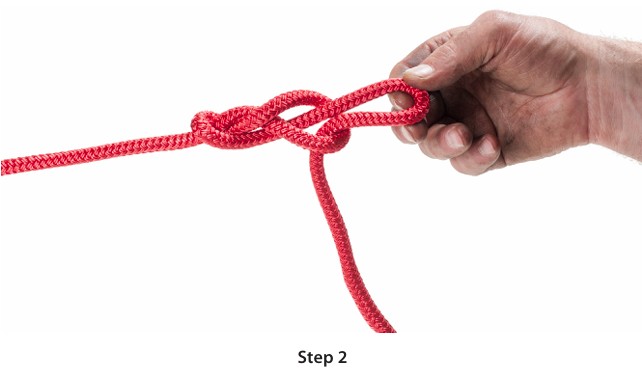
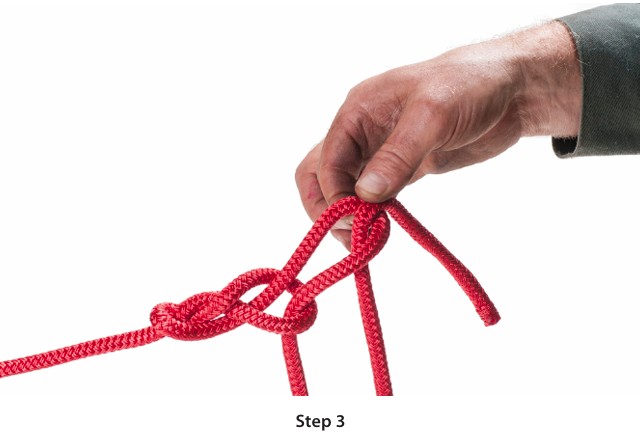
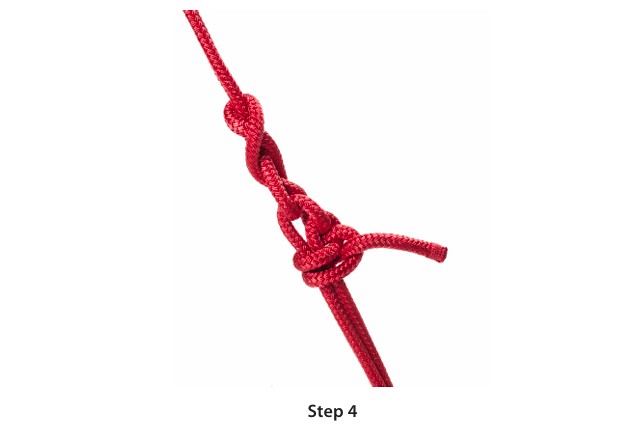
Figure Eight Knot
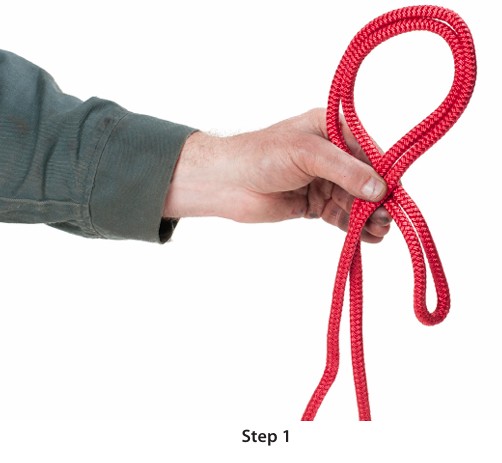
The simple figure eight knot is used to form a stopper on the end of a rope. This “stopper” is used to prevent the rope from running through a sheave or pulley or to stop the rope from slipping through another knot.
How to Tie a Figure Eight Stopper
- Form a loop.
- Pass the end around the standing part.
- Bring the end back through the loop.
- Tighten.
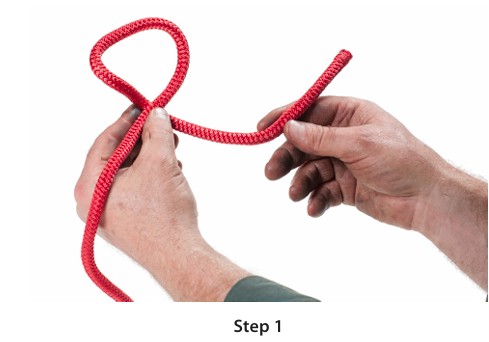
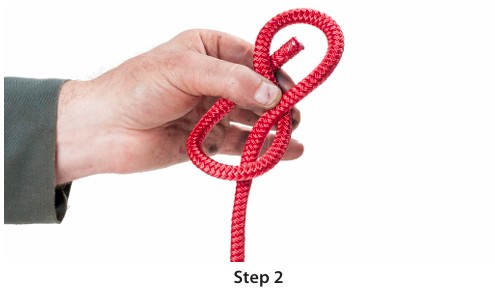
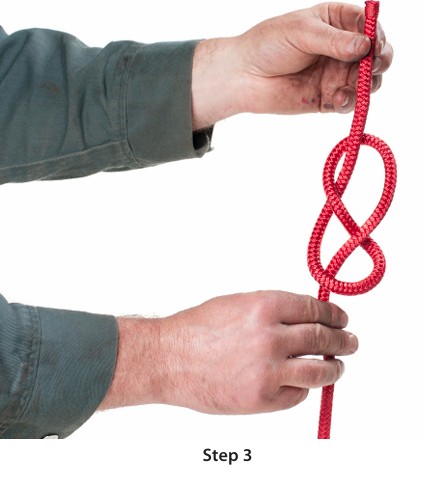
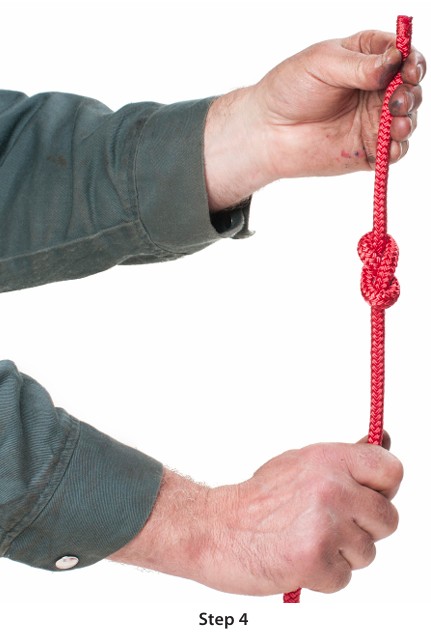
Figure Eight Loop
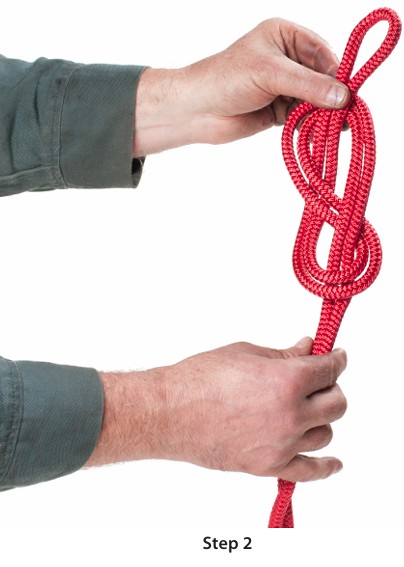
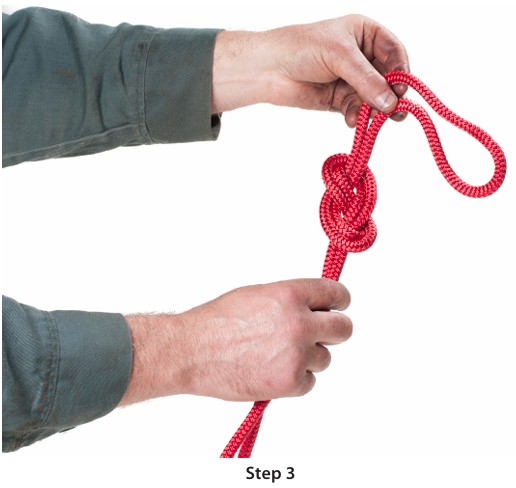
A figure eight knot can also be tied into a non-slip loop. This loop could be used to secure the end of a lifeline around a solid object.
Tying a Figure Eight Loop
- Tie a regular figure eight but leave a long tail.
- Wrap the tail around the object.
- Take the end of the tail and retrace the path of the rope back through the figure eight.
- Pull the knot snug.
Do not join ropes for overhead lifting! Use only single-piece ropes.
Video Resources
The following videos by Camosun College (2022) demonstrate important rope knots used in rigging operations.
-
Knots and Hitches [10:03]– Demonstrates several common knots used to secure loads and rigging equipment.
-
Trucker’s Hitch [3:00]– Shows how to tie a trucker’s hitch to create mechanical advantage when tightening rope.
- How to Whip the End of a Rope [2:57] – Demonstrates how to apply whipping to prevent the end of a rope from fraying and to extend the rope’s service life.
 Self-Test B-4.4: Select Slings and Tie Knots, Bends and Hitches
Complete Self-Test 4.4 and check your answers.
If you are using a printed copy, please find Self-Test A-4.4 and Answer Key in the Appendix at the end. If you prefer, you can scan the QR code with your digital device to go directly to the interactive Self-Test.

References
BC Industry Training Authority. (2019). Piping trades apprenticeship program: Use Tools and Equipment—Level 1 harmonized [Binder]. Crown Publications, Queen’s Printer for British Columbia. https://www.crownpub.bc.ca/Product/Details/7960000261_S
Camosun College. (2019). Line C: Tools and Equipment—C-4: Describe Ladders and Work Platforms (Rev. ed.) [Learning guide]. BCcampus. https://collection.bccampus.ca/textbook/7c8Ymhnk/
Camosun College. (2015). Trades Access Common Core Competency C-4: Describe Ladders and Work Platforms. Victoria, B.C.: Crown Publications. Download for free from the B.C. Open Textbook Collection (https://open.bccampus.ca/browse-ourcollection/find-open-textbooks/).
Camosun College. (2022a). Knots and hitches [Video]. BCcampus Media. https://media.bccampus.ca/media/Knots%20and%20Hitches/0_1zyju8c0
Camosun College. (2022b). Trucker’s hitch [Video]. BCcampus Media. https://media.bccampus.ca/media/Truckers%20Hitch/0_x4iyzc34
Camosun College. (2022c). How to whip the end of a rope [Video]. BCcampus Media. https://media.bccampus.ca/media/How%20to%20Whip%20the%20End%20of%20a%20Rope/0_rhafq2j5
Media Attributions
All figures are sourced from Industry Training Authority (2019) and/or Camosun College (2019) and are used under the Creative Commons Attribution 4.0 (CC BY 4.0) licence unless otherwise noted. Images copyrighted by the BC Industry Training Authority are licensed under a Creative Commons Attribution-NonCommercial-ShareAlike 4.0 (CC BY-NC-SA 4.0) licence.
A metal fitting placed inside the eye (loop) of a wire rope or fibre rope to protect it from wear and crushing. The thimble helps the rope keep its shape and prevents damage when the rope is attached to hooks, shackles, or other rigging hardware. (Section B-4.4)
A method of tightly wrapping twine or wire around the end of a rope to prevent it from fraying or unraveling. (Section B-4.4)
A curved section or loop formed in a rope without crossing the rope over itself. It is often used when tying knots or attaching the rope to another object. (Section B-4.4)
The long, main portion of a rope that is not actively used to tie the knot. It carries most of the load when the rope is under tension. (Section B-4.4)
(working end) The free end of a rope used to tie knots, bends, or hitches. It is the part of the rope that is manipulated during rope tying. (Section B-4.4)
A knot used to create a fixed loop at the end of a rope that will not tighten or slip under load. It is commonly used in rigging and rescue situations because it is strong and easy to untie after use. (Section B-4.4)
A loop tied in a rope that will not tighten or slide when weight or tension is applied. It helps keep loads secure during lifting or pulling. (Section B-4.4)
A variation of the bowline knot that forms two secure loops in the middle of a rope without using the rope’s end. It is often used for lifting or supporting a person or load. (Section B-4.4)
A seat or platform suspended by ropes that allows a worker to sit safely while working at height, such as when performing maintenance or installation tasks. (Section B-4.4)
(or square knot); A simple knot used to tie two ends of a rope together. It is commonly used for securing bundles or light loads but should not be used for heavy lifting or critical rigging because it can slip under strain. (Section B-4.4)
A knot used to join two ropes together, especially when the ropes are different sizes or materials. It forms a secure connection that is commonly used in rigging and rope work. (Section B-4.4)
A knot used to attach a rope to another rope, pole, or object so it grips tightly when pulled lengthwise. It is commonly used to take strain off a loaded rope or to secure a line that may be under tension. (Section B-4.4)
A knot used to quickly attach a rope to a post, pole, or pipe. It is easy to tie and untie but can slip if the load changes or becomes loose. (Section B-4.4)
A knot used to secure a rope around logs, poles, or other long objects for lifting or dragging. The knot tightens when tension is applied and loosens easily when the load is removed. (Section B-4.4)
A knot system used to tighten a rope when securing loads. It creates a mechanical advantage that allows the rope to be pulled very tight, making it useful for tying down equipment or materials. (Section B-4.4)