B-3.2 Use Ladders and Elevated Platforms
Portable Ladder Safety
Portable ladder safety requirements are governed by workplace regulations. In British Columbia, these requirements are outlined in WorkSafeBC’s Occupational Health and Safety Regulation, Part 13: Ladders, scaffolds and temporary work platforms, available on the WorkSafeBC website.
The following rules apply to all portable ladders:
- Inspect all portable ladders before use.
- Do not use ladders with loose, broken, or missing rungs, split side rails, or other dangerous defects.
- Ensure that aluminum ladders have all members straight and properly aligned.
- Remove from use any aluminum ladder with bends, kinks, or other damage.
- Have damaged ladders repaired by an appropriate and reputable firm before putting them back into service.
- Do not use metal ladders or wire-reinforced wooden ladders near energized electrical equipment.
- Use only transparent protective coatings or preservatives on wooden ladders, so that possible defects remain visible during inspection.
- Never reach more than one arm’s length beyond the side of the ladder.
- Do not carry heavy or bulky items while climbing up or down ladders.
- Always face the ladder when climbing up or down.
- Ensure that all ladders bear the appropriate Canadian Standards Association (CSA) label.
Carrying, Setting Up, and Using Ladders
Single and extension ladders have the same basic requirements for safe use:
- Rest the foot of the ladder on a firm, level base.
- Choose a ladder of sufficient length to project at least 1 m (3 ft) above the level of the landing to which it provides access.
- Do not stand on the top two rungs or cleats.
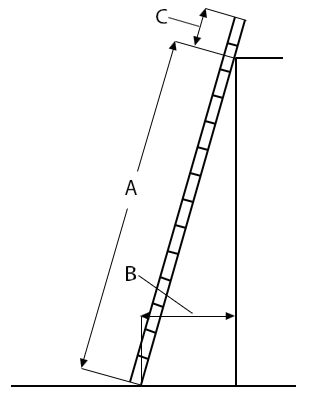
- See the illustration for Figure 1: It shows a side-elevation view of a ladder leaning against a building. If dimension A is 4 m (13 ft), then B should be approximately 1 m (3 ft), and C should extend approximately 1 m (3 ft) above the level of the landing.
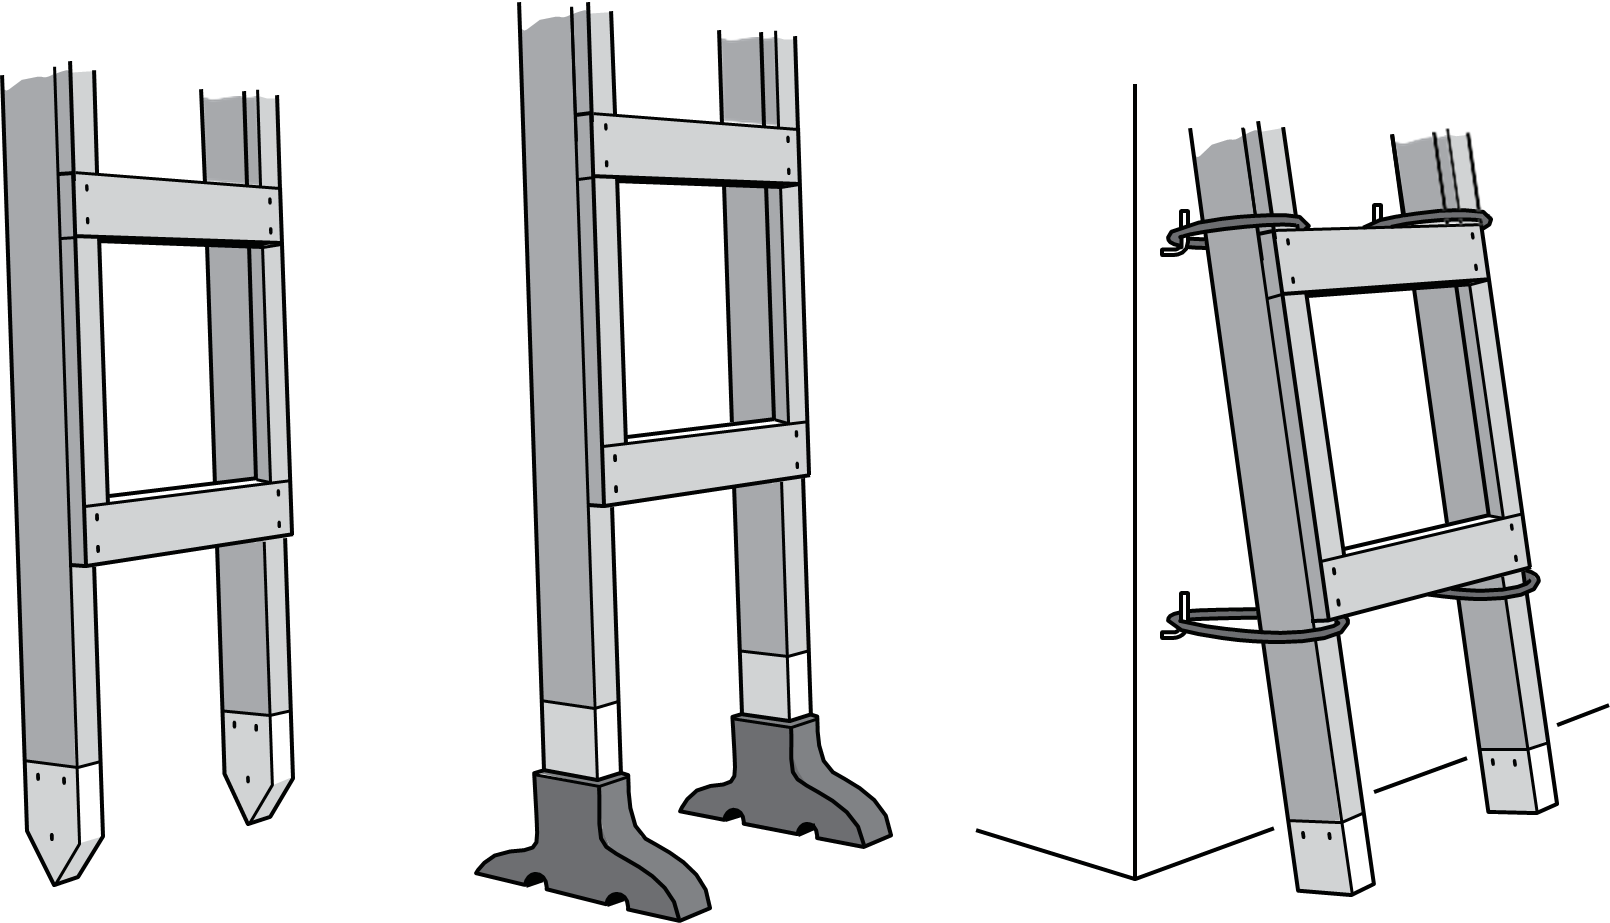
- Ladders must have slip-resistant safety feet or be secured to prevent slipping during use.
Setting Up Single and Extension Ladders
It is important to use the correct methods for setting up ladders to avoid injury to the person or damage to the ladder. Check for overhead wires or other hazards before lifting the ladder.
Setting Up Alone
The following steps should be followed when setting up or taking down a ladder when you are alone.
- Lay the ladder on the ground with the base resting against the wall and the top pointing away from the wall.
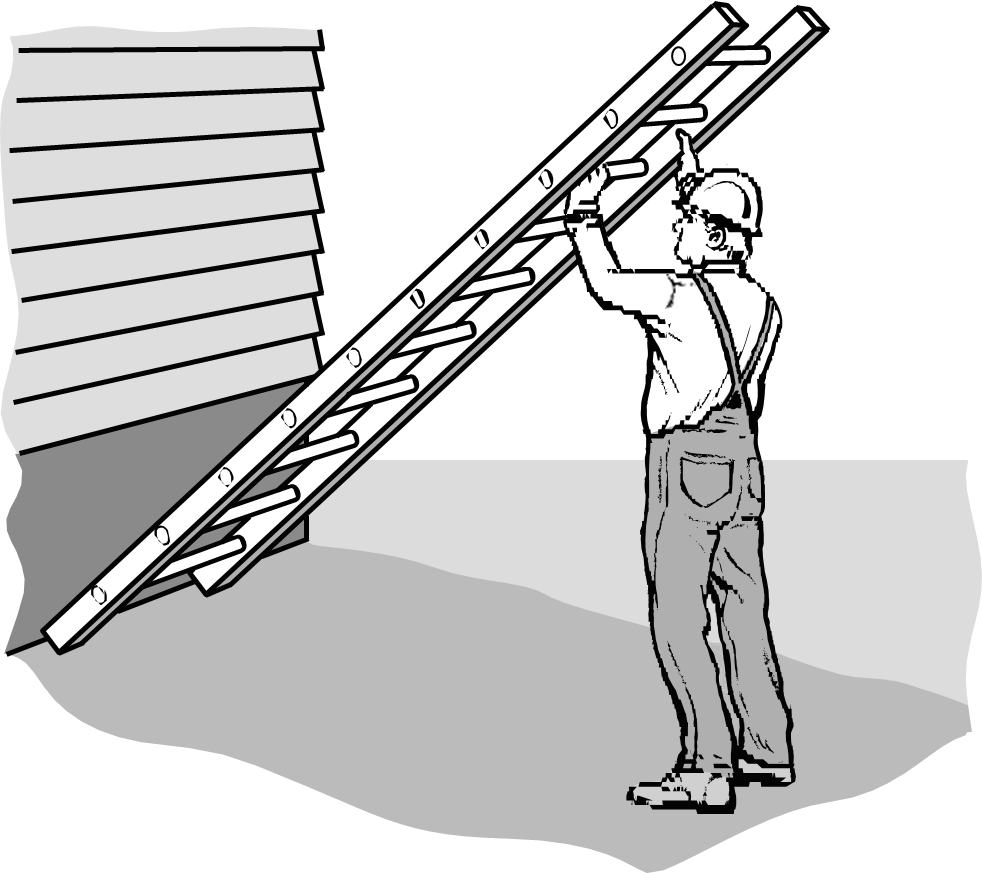
- Starting at the top of the ladder, lift the end over your head and walk under the ladder toward the wall, moving your hands from rung to rung as you go (Figure 3).
- If you find you are unable to raise the ladder enough, set it back down and get help.
- Adjust the slope of the ladder so that the distance from the wall at the base is one-quarter of the height of the landing being accessed.
- If necessary, secure both the top and bottom to prevent dislodgment.
- Reverse this process to take down the ladder, and remember that you will be walking backwards, so check your path for obstacles before you start.
- Lower the ladder slowly so that you keep it under control and prevent it from falling on you.
Setting Up with a Helper
The following steps should be followed when setting up or taking down a ladder with someone else’s help:
- Lay the ladder flat on the ground, with its feet at the point where they will be placed during use, and with its length parallel to the surface against which it will be placed.
- With the helper holding the base of the ladder in place, lift the top of the ladder over your head.
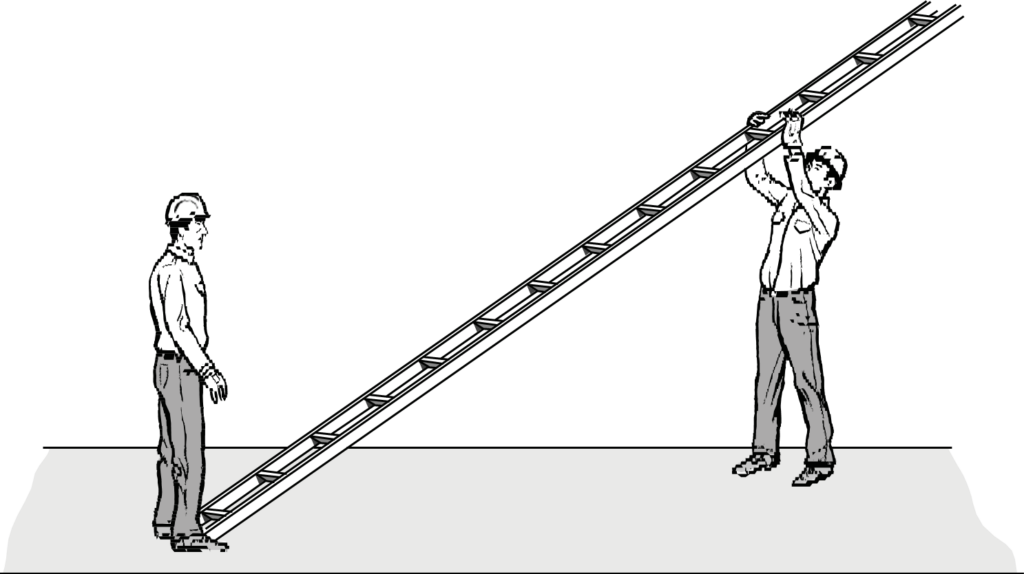
- Walk down the length of the ladder, lifting as you go and moving your hands from rung to rung, while your helper bears some of the ladder’s weight (Figure 4).
- When the ladder is straight up, lower the top gently against the wall.
- If necessary, secure both the top and bottom to prevent dislodgment.
Follow these steps in reverse to take down the ladder. Remember to check your path for obstacles because you will be walking backwards. Gravity will cause the ladder to fall if not controlled at all times.
Ladder Maintenance and Storage
In addition to a routine inspection before use, proper maintenance and storage of a ladder will help ensure that it is safe to use. The following steps highlight important practices for maintaining ladders:
- Wipe the ladder clean to keep it free of oil, grease, or grime.
- Replace frayed or worn ropes on extension ladders.
- Treat wood ladders with a clear finish or penetrating preservative. NEVER paint a wood ladder because paint can hide damage.
- Clean and lubricate pulleys on an extension ladder.
- Store ladders away from heat, moisture, weathering, and sunlight. Ultraviolet (UV) rays damage fibreglass, and heat and moisture can cause wood ladders to rot.
- Properly store ladders on a rack; do not store materials on ladders.
General Requirements for Scaffolds
The following specifications apply to all scaffolds:
- Scaffolds shall be erected, maintained, and dismantled under the direct personal supervision of an experienced, competent worker.
- Use a spirit level to set standards and ledgers accurately in both horizontal and vertical alignment at each lift.
- All wood planks shall be unpainted and regularly inspected for defects.
- Place the inner row of standards as close as possible to the wall. If they are more than one plank width from the wall, install an inside guardrail and midrail. The work platform must be fully planked.
- Standards shall be spaced no more than 2.1 m (7 ft) apart for heavy work and 3 m (10 ft) apart for light work.
Erecting Welded Frame Scaffolds
Scaffolds should be erected by two or more people. The following instructions are provided as a general guideline; always follow the manufacturer’s or supplier’s specifications. These steps describe the assembly of a scaffold that is one frame high. Additional frames should be added after Step 5 and before installing the guardrail system. Before erecting a scaffold, ensure you are familiar with OHS Regulation Part 11: Fall Protection and applicable Workers’ Compensation Board (WCB) requirements available on the WorkSafeBC website.
- Select and prepare the ground area. Select the equipment you need and place it near your work area. Place suitable sills and make sure there are no holes under the sills. Put the adjustable base plates onto the sills to match your approximate scaffold dimensions, but don’t secure them to the sills yet. Adjust the base plate jack nuts so they are approximately level, starting with the jack nut at the highest level and setting it relatively low—about 7.5–15 cm (3–6 in.) from the top of the sill.
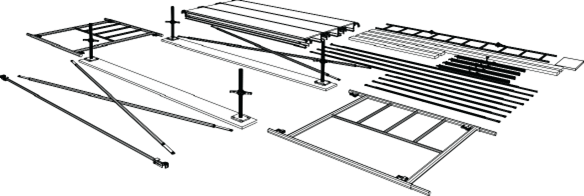
(Courtesy of WorkSafeBC)
If you are erecting a rolling scaffold, you will not install sills or base plates because you will be working on a hard, level surface. In this case, you can start by installing the four wheels onto the first two frames.
- Place the first frame onto the base plates, then connect a cross brace to the frame. Allow the frame to lean slightly forward and rest on the sill while you prepare to install the next frame.
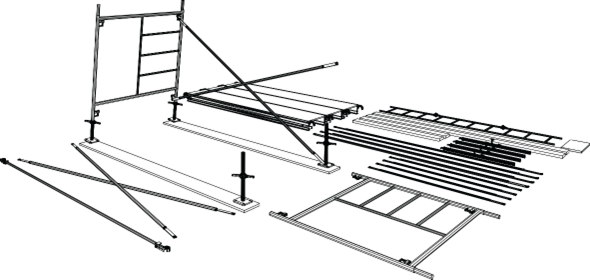
(Courtesy of WorkSafeBC)
- Install the second frame onto the base plates and secure the previously connected cross brace to the second frame.
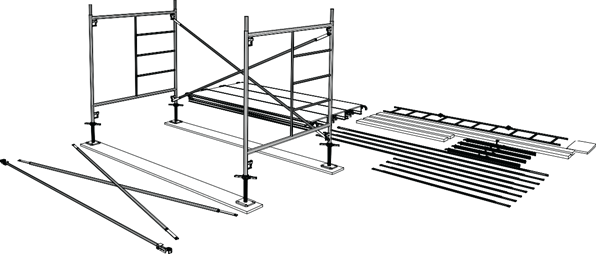
(Courtesy of WorkSafeBC)
- Install the second cross brace to both frames, then level the scaffold using the jack screws. If possible, always bring the highest corner down. Install the plan brace (gooser bar) to keep the scaffold square. Fasten the base plates to the sills.
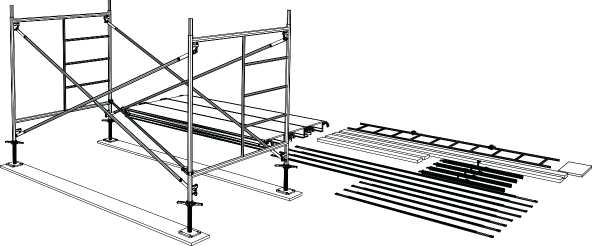
(Courtesy of WorkSafeBC)
- Install the decking, which may be metal or wood planks, or aluminum and plywood decking units.
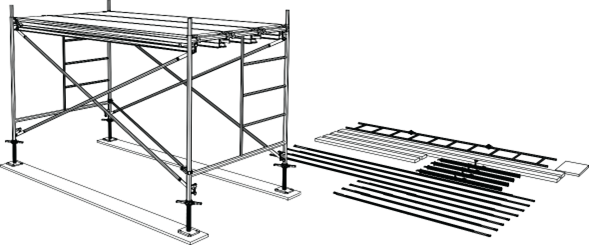
(Courtesy of WorkSafeBC)
- Select the appropriate guardrail system. If your system is purpose-made for frame scaffolds, install the four posts into the vertical coupling pins on top of the frames. Make sure all coupling pins have two locking pins or spring clips to prevent separation.
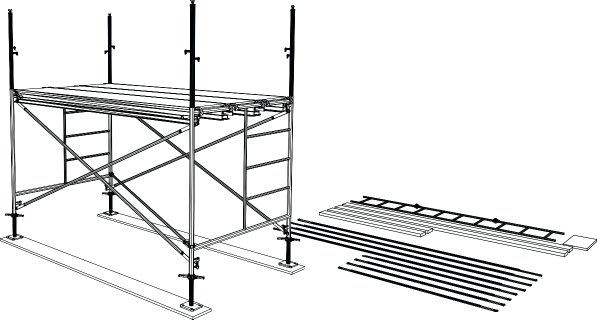
Figure 10 Install guardrail posts
(Courtesy of WorkSafeBC)
- Attach the guardrails and midrails to the posts on all exposed sides.
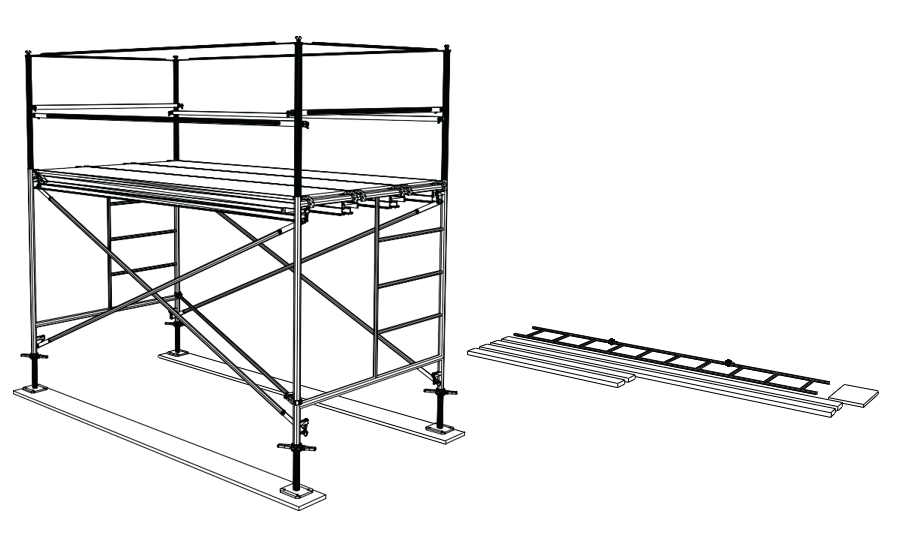
(Courtesy of WorkSafeBC)
- Install toe-boards as required.
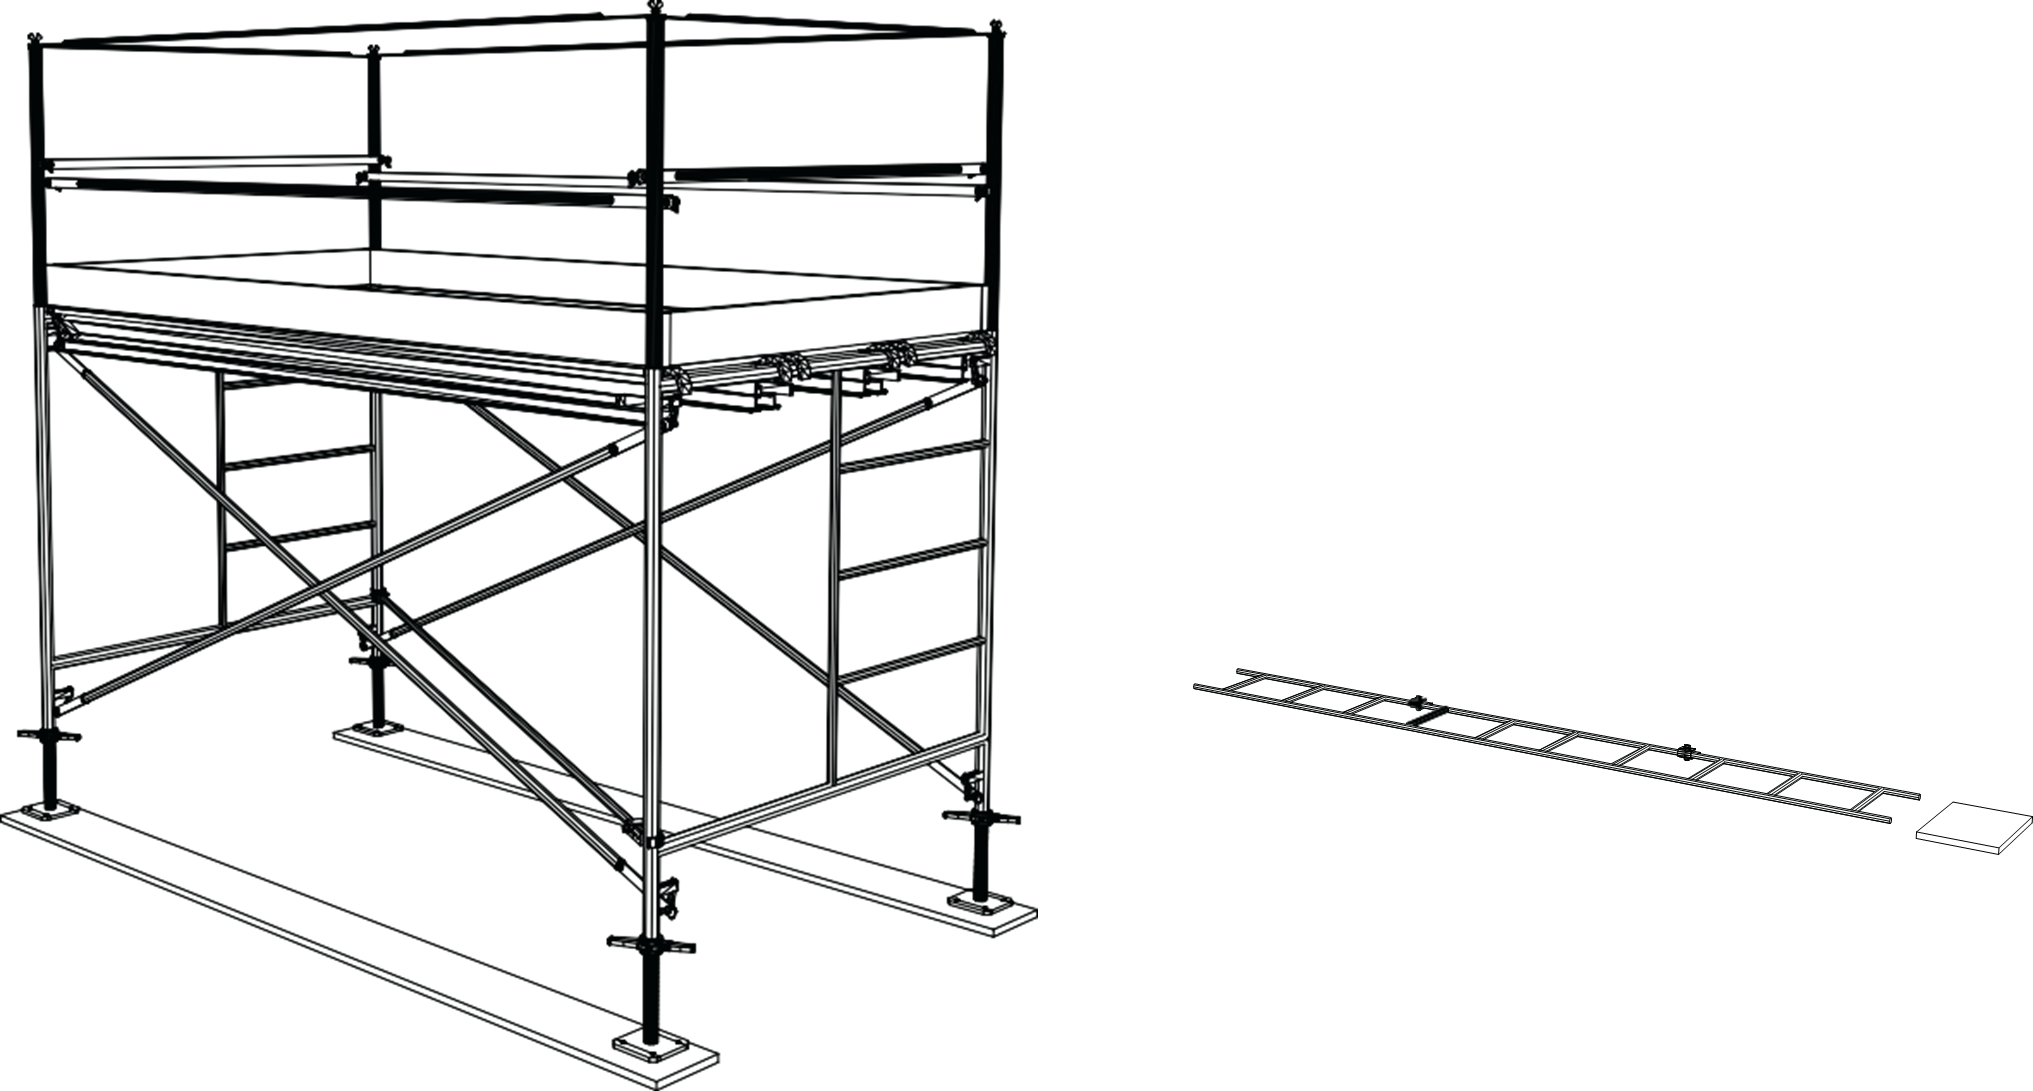
(Courtesy of WorkSafeBC)
 Self-Test B-3.2: Use Ladders and Elevated Platforms
Complete Self-Test 3.2 and check your answers.
If you are using a printed copy, please find Self-Test A-3.2 and Answer Key in the Appendix at the end. If you prefer, you can scan the QR code with your digital device to go directly to the interactive Self-Test.

References
BC Industry Training Authority. (2019). Piping trades apprenticeship program: Use Tools and Equipment—Level 1 harmonized [Binder]. Crown Publications, Queen’s Printer for British Columbia. https://www.crownpub.bc.ca/Product/Details/7960000261_S
Camosun College. (2019). Line C: Tools and Equipment—Competency C-4: Describe Ladders and Work Platforms (Rev. ed.) [Learning guide]. BCcampus. https://collection.bccampus.ca/textbook/7c8Ymhnk/
Camosun College. (2015). Trades Access Common Core Competency C-4: Describe Ladders and Work Platforms. Victoria, B.C.: Crown Publications. Download for free from the B.C. Open Textbook Collection (https://open.bccampus.ca/browse-ourcollection/find-open-textbooks/).
WorkSafeBC. (n.d.). Part 11: Fall protection. Occupational Health and Safety Regulation.
https://www.worksafebc.com/en/law-policy/occupational-health-safety/searchable-ohs-regulation/ohs-regulation/part-11-fall-protection
WorkSafeBC. (n.d.). Part 13: Ladders, scaffolds and temporary work platforms. Occupational Health and Safety Regulation. https://www.worksafebc.com/en/law-policy/occupational-health-safety/searchable-ohs-regulation/ohs-regulation/part-13-ladders-scaffolds-and-temporary-work-platforms
Media Attributions
All figures are sourced from Industry Training Authority (2019) and/or Camosun College (2019) and are used under the Creative Commons Attribution 4.0 (CC BY 4.0) licence unless otherwise noted. Images copyrighted by the BC Industry Training Authority are licensed under a Creative Commons Attribution-NonCommercial-ShareAlike 4.0 (CC BY-NC-SA 4.0) licence.
- Figures 5-12 are courtesy of WorkSafeBC and are used with permission.
A platform or surface at the top or bottom of a ladder where a person safely steps onto the ladder or off the ladder, rather than standing on the top of the ladder itself. (Section B-3.2)
The round bars on a ladder that you step on when climbing. (Section B-3.1)
Flat wooden strips used as steps on some job-built ladders. (Section B-3.1)
Rubber or textured ends attached to the bottom of a ladder that help prevent it from sliding and keep it stable on the ground. (Section B-3.2)
Flat pieces of wood or other material placed under scaffold supports to spread the load and provide a stable base on the ground. (Section B-3.2)
Flat metal plates placed under scaffold legs to spread the weight and help keep the scaffold stable. (Section B-3.2)
A diagonal support that connects scaffold frames and helps keep the structure stable and rigid. (Section B-3.2)
A metal support bar used on scaffolding to keep the scaffold frame square and stable. It connects parts of the scaffold to prevent the structure from twisting or shifting out of alignment. (Section B-3.2)