B-2.2 Use Portable Power Tools
Electric Portable Power Tools
Proper maintenance improves the service life and performance of the tool. Correct setup and operating procedures ensure good results and aid in the prevention of injury. If electrically powered tools are not handled cautiously and kept in good condition, they become dangerous sources of electric shock and serious wounds. Power tools may also be cordless. These tools are extremely versatile in that you do not need to have an electrical cord connecting the tool to the power source. These tools are safer than standard power tools in that the risk of electric shock is greatly reduced, and there is no cord that could contribute to a tripping or mobility hazard.
Using and Maintaining Electric Power Tools
The following are important considerations when using portable power tools:
- They should be stored in an appropriate storage area.
- They should be carefully inspected before being taken out of storage and used.
- They should be routinely cleaned and lubricated, if required.
- Cordless tools should have the batteries charged and ready for use.
The following are more specific rules for handling and maintaining electric power tools:
- To prevent damage to the tool, be sure that the voltage of the power source matches the requirements of the tool.
- Be sure that the batteries are the correct type for the tool and that they are properly charged.
- Keep a spare charged battery on hand.
- Be sure that the equipment is properly connected to the power supply and that the circuit is grounded or the tool double-insulated.
- Keep the plug and cord in good condition: there must be no loose prongs on the plug and the cord must not show any signs of deterioration.
- Be sure that the switches on the tool work properly.
- Make sure that the switch is in the off position before you connect a power tool to a power supply.
- Before you switch on equipment, check to see if all the guards are in place and in good working order.
- Never carry a power tool by the cord or yank the cord to disconnect it from the receptacle.
- Keep the cord away from heat, oil, and sharp cutting surfaces.
- Never operate a power tool near explosive or flammable liquids or materials.
- If you plan to cut into a wall, floor or ceiling, make sure that there is no live wiring behind it.
- If an extension cord must be used, make sure that it is approved for heavy-duty work.
- Keep the air cooling passages in the tool clean and free of obstructions.
- Compressed air may be used to clean the tool’s air cooling passages, but the pressure must be limited to 69 kPa (10 psi) or less and eye protection must be worn, as dictated by workplace regulations.
- Make sure that the cutting edge of a tool is kept sharp and that the bit or blade is securely fastened in the tool.
- Stay focused on your work.
- Never operate power equipment until you are sure you know how to use it.
- Make sure that the work is secure and will not slip under the force of the tool.
- Make all required adjustments before you start up the tool.
- Know how you intend to use the tool before you activate it.
- Wear eye protection when you use power saws and other power equipment that kicks up dust and particles.
- Feed the work to the machine or the machine to the work carefully and at a pace suitable for both the machine and the operation.
- Turn off the power when you finish the work, then wait until moving parts come to a stop before you leave the machine.
- Never use a power tool with a deformed or cracked housing, or with a broken handle or part. Damaged or inoperative tools should be reported to a supervisor.
- Before storing a power tool, wipe dust, dirt and chips off it with a cloth.
- Clean plastic parts with a soft cloth lightly dampened with soapy water. Never clean them with solvents such as gasoline, thinner, benzene, carbon tetrachloride or alcohol as these substances damage and crack plastic.
- Never allow the motor portion to become wet with water or oil.
- Store tools properly. For example, drills, screw guns and routers should have the bits removed, a circular saw must have the guard in place, sabre and reciprocating saws must have the blades removed, or the blades must be adequately protected.
Grounding Tools and Equipment
All tools and equipment that are operated by electricity must be grounded or of the double-insulated type. Workplace regulations require that when used outdoors or in a damp location, portable electrical equipment, including temporary lighting, be protected by an approved ground fault circuit interrupter (GFI).
On tools that are not double-insulated, you must use a three-wire cord and the proper U-ground prong on the cord. By properly grounding the equipment, the operator should not receive an electrical shock if the tool or equipment develops a short circuit.
Portable Electric Circular Saws
When using portable saws:
- Make sure that there is enough set in the teeth to produce proper clearance for the blade
- Make sure that the work is well supported, as this will keep the kerf (the slot cut by the saw) open and prevent the saw blade from binding during the cut
- Support thin pieces near the cut and clamp small pieces to the workbench or sawhorse
- Never use a blade that is dull, has missing teeth, or requires setting
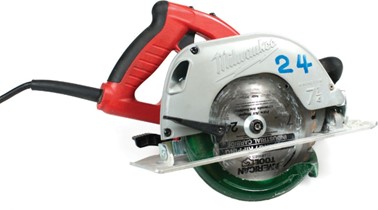
- Adjust the depth of the cut to the thickness of the stock plus [latex]\frac{1}{8}[/latex] in. to [latex]\frac{1}{4}[/latex] in. (3 mm to 6 mm) more
- Check to make sure that the base of the saw, the guide and all other adjustments are tight
- Place the base of the saw on the stock, making sure that the blade is clear before you turn the saw on
- While making the cut, stand to one side of the cutting line
- Never reach under the material while it is being cut
- If the saw stalls during a cut, release the trigger, back out the saw until it is free of the material, then resume the cut
- If the saw continues to stall, unplug it and look at the condition of the blade and the set of the teeth
- When you come to the end of a cut, release the trigger and allow the blade to come to a standstill—lift the saw away from the stock but do not twist the saw as you lift, otherwise you may score the work
- Always make sure that all guards are in place and functioning properly before using the saw
Powered Cut-Off (Chop) Saws
You need to be especially safety-conscious while operating this tool. Consider the following before using a powered cut-off saw:
- Make sure the blade guard is in place before operating the machine
- Secure the workpiece in the vise or clamp. Never hold the piece with your hands
- If you are cutting long pieces, have the end supported or held by an assistant, as the piece could kick back and break the cut-off blade
- Use a face shield, not just eye protection
- Use leather gloves to handle the cut pieces as they will be hot and likely will have sharp edges
- Do not use excessive force when cutting, and be careful not to bump the blade onto the work, as this could break the blade
- During the cutting operation, do not stand in line with the cut-off blade. Stand off to one side so that if the blade breaks, you will not be in line with flying pieces
- Avoid the temptation to use the side of the abrasive cutting blade for grinding purposes as it will weaken the blade
Reciprocating Saws
Plunge-Cutting Wood with a Reciprocating Saw
To save time on the job site, a plunge cut can be made in plywood without having to pre-drill a starter hole.
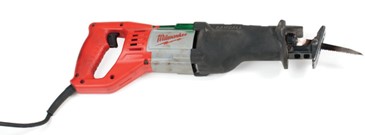
- To make plunge cuts into wood or similar material, start by holding saw parallel to material, resting saw guide firmly against material but without having blade touch material.
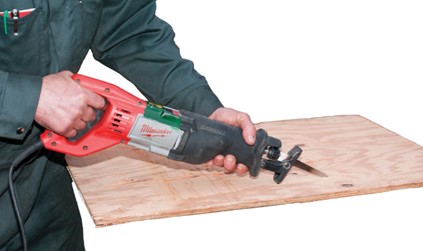
- While holding saw firmly against material, press the OFF/LO/HI switch and pivot handle end of saw, slowly bringing blade in contact with material.
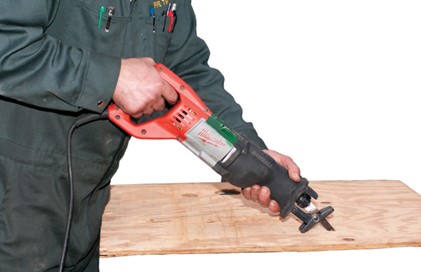
- Raise saw slowly to upright position, keeping saw guide pressed firmly against material, and guide saw in this position along line of cut.
Portable Electric Drills
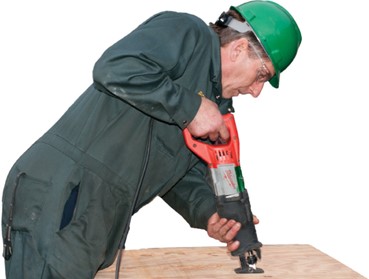
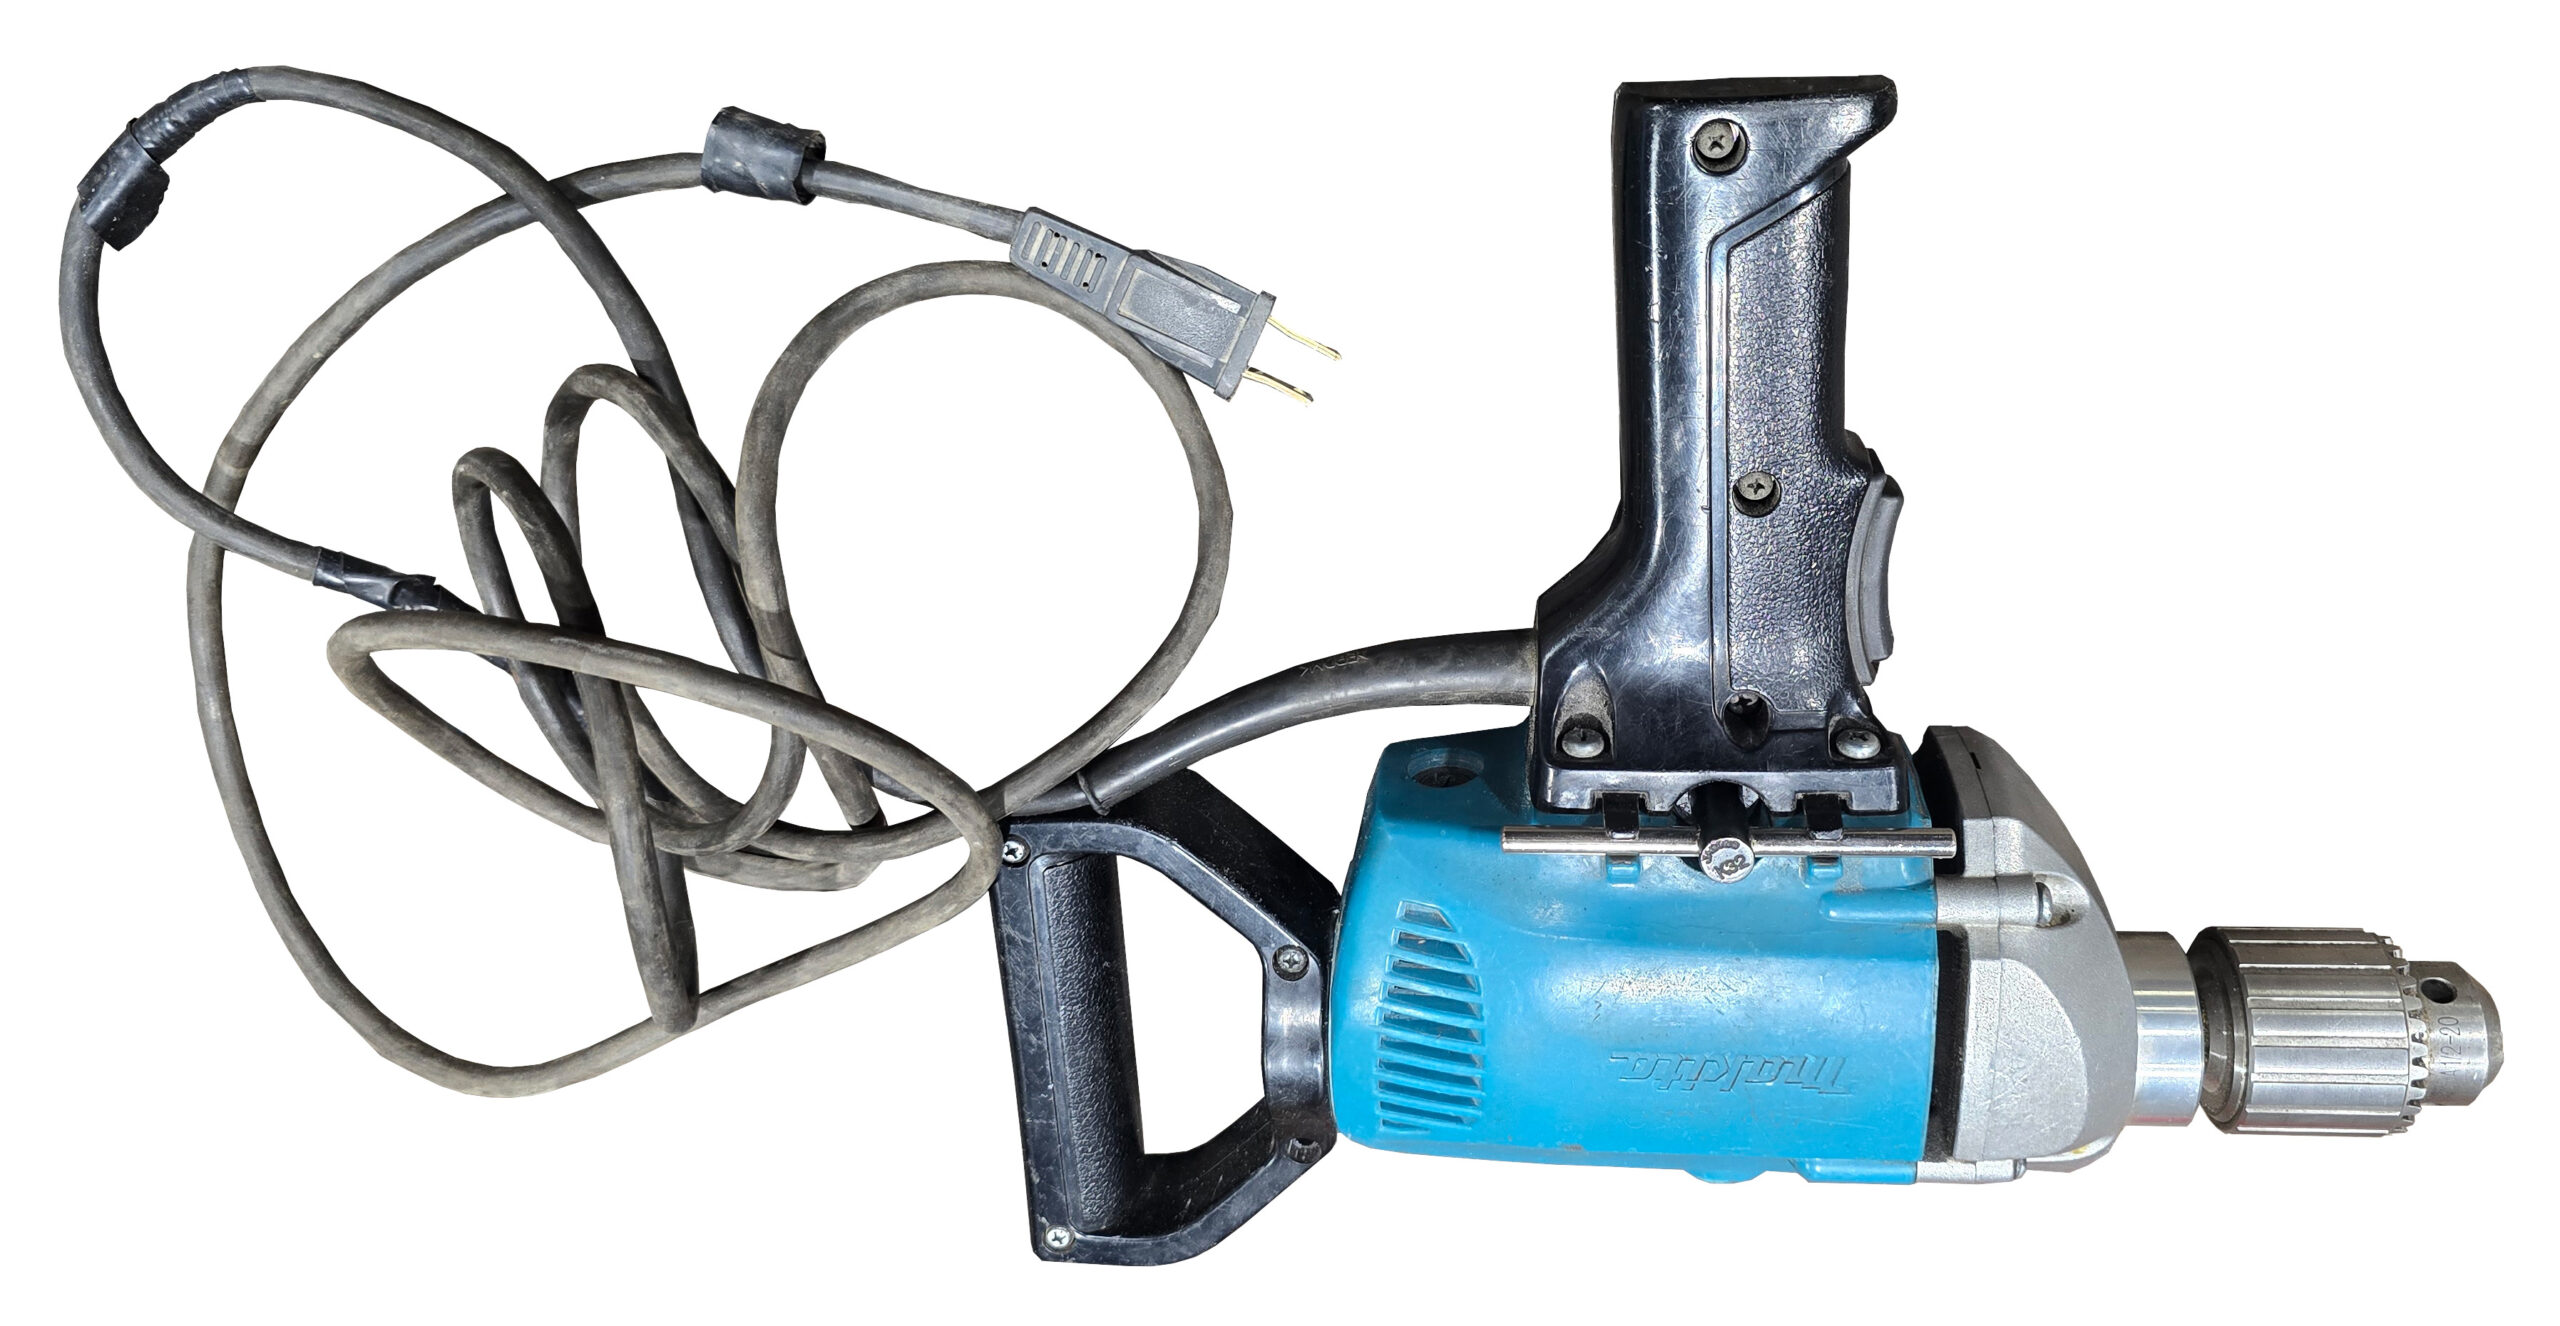
During heavier drilling operations, use both hands: one to apply force to the back end of the drill, and the other to hold the handle to counteract the torque generated by the drill. Always allow the motor on a reversible drill to come to a complete stop before switching the motor direction. Failure to do so will damage the motor.
Safety
If the bit jams, the forces used to turn the drill bit will be suddenly transferred to turning the electric drill. This sudden spinning of the tool in your hands can bruise, sprain muscles, or even break bones depending on the speed and torque of the tool. The risk of jamming increases with the diameter of the drill bit.
The more powerful the motor of the drill, the more force you will need to stop the drill from rotating. The faster the rotation of the drill bit, the more violent the reaction to jamming. If a risk of jamming exists, you should never lock the switch in the ON position. Keep your body clear of any path within the rotation of the drill. Be extremely cautious when drilling from elevated platforms or ladders.
Sharpening a Twist Drill
A correctly sharpened twist drill will cut mild steel with ease. Metal shavings should be produced equally by the two cutting lips of the drill. These shavings should eject from the hole in the shape of spiral coils. When the drill bit becomes dull, it must be sharpened.
There are jigs made to hold twist drills at the proper angle to the grindstone for sharpening. These jigs are not always available, so it is valuable to learn how to sharpen a twist drill by the free-hand method.
Correct Drill Bit Angles
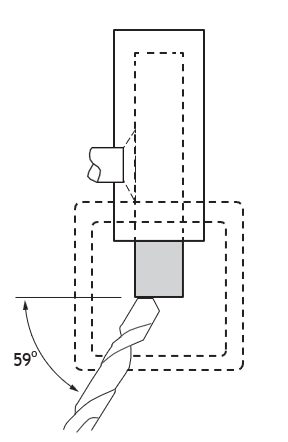
For normal use, a twist drill will have the cutting lips at 59° to the axis of the drill. Check the angle of the cutting lip with a drill grinding gauge. Both lips should be at the correct angle and equal in length.
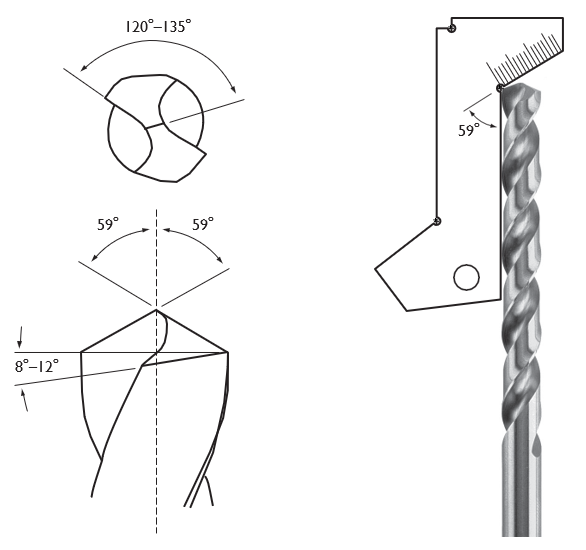
(BC Industry Training Authority, 2019). CC BY-NC-SA 4.0
Lip clearance on a drill bit can be compared to the heel clearance of a wood chisel. Not enough lip clearance will result in the cutting edge being held away from the workpiece surface. This chisel in the center image will cut when moved in the direction of the arrow because the heel clearance allows the cutting edge to make contact with the surface of the wood. Too much lip clearance, as shown at right, leads to rapid dulling of the cutting edge.
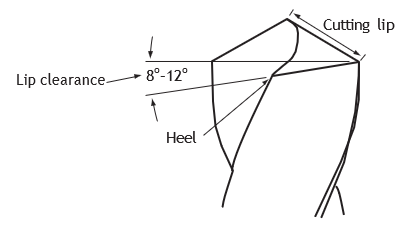
Lip clearance on a twist drill is the angular difference between the heel and an imaginary horizontal line perpendicular to the lip. On a twist drill, a lip clearance of 12° is usually considered adequate. The heel of each cutting face rises 12° from the left end to the right end.
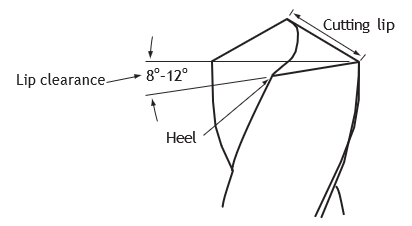
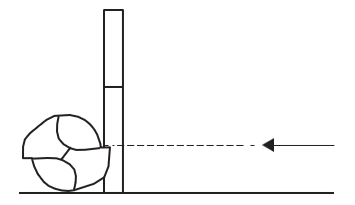
Another method of measuring the lip clearance angle is to use the 12° end cut on the drill grinding gauge. To use this gauge accurately, place it on its edge on a flat surface. Lay the twist drill behind the gauge with the point of the drill toward the 12° end of the gauge. The slope of the heel should be parallel to the 12° end of the gauge.
The drill should be lying with its cutting lips parallel to the flat surface and should be sighted, as illustrated.
Hammer Drills
Drilling and setting concrete anchors is commonly done with a hammer drill or roto-hammer.
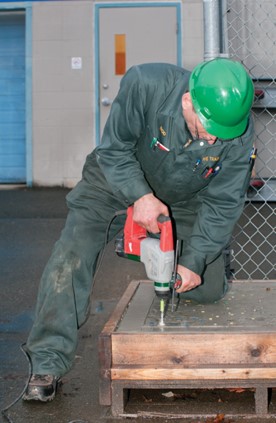
There are many types of concrete anchors, but all serve the same purpose. They provide a secure mount for a bolt or a stud so that attachments can be made to a wall or foundation.
Consider the following points when setting anchors.
- The strength of the concrete determines the holding power of the anchor. Drill only anchors into cured concrete and do not attempt to fasten to spalled (fractured) or cracked surfaces.
- Follow the manufacturer’s instructions for installing the anchor.
- Most concrete anchors use a wedging action to hold the anchor in place. The wedging action will work only if the diameter of the hole is the correct size for the anchor being used. Refer to the anchor manufacturer’s specifications for the appropriate diameter of hole.
- The depth of the hole is also critical. Use the depth gauge to ensure the depth is exactly as specified by the manufacturer.
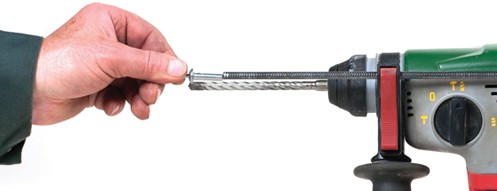
Always use steel bits with carbide tips when drilling into concrete with a hammer drill or a rotary hammer. Carbide-tipped bits are extremely hard and are designed to stand up to concrete. Helix-shaped bits are designed specifically for concrete. The helix shape removes the maximum amount of debris and helps to prevent the drill from binding in the hole.
Carbide tips are extremely hard, but also very brittle.
Never try to straighten a bent bit in a hole or to use the drill like a lever because the tip of the bit will chip and may break off.
Handle carbide-tipped bits with care. Do not allow them to drop onto hard surfaces. Store them in separate spaces to keep the tips from hitting together.
Carbide-tipped bits are usually very expensive to replace.
Demolition Hammers
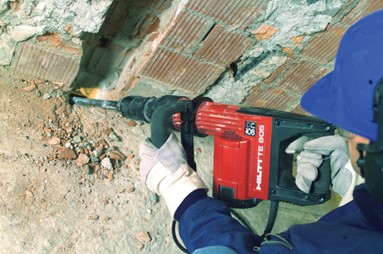
Demolition hammers are used to chip or break up concrete foundations, walls or blocks.
- Use the shortest bit that is practical for the job. Long bits tend to bend and absorb some of the blow’s energy.
- Make sure that the bit is sharp before you start work (careful to not remove the bit’s temper).
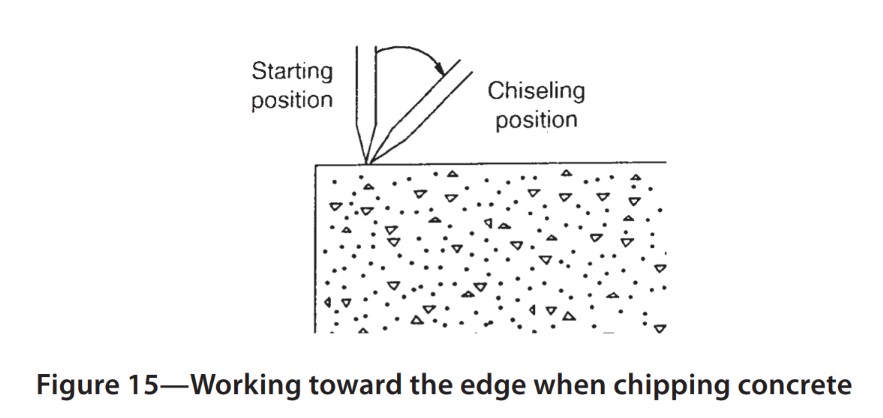
- When you work with a demolition hammer, start the bit into the edge of the block or slab and turn it toward the edge. Take small “bites.”
- Always allow the weight of the hammer to assist in the breaking action. Use its weight to your advantage but always maintain your balance.
Portable Grinders
Wheel (Disk) Selection
Selection of the correct grinding wheel or disk not only depends on the abrasive type, grain size, bonding material, grade, structure, size and shape, but also on the grinding machine, the material to be ground, and the nature of the operation. Medium-grain wheels (30 to 60 grit) are often chosen when only one metal-removing or sharpening operation is desired and the resulting surface finish is acceptable. Wheels having coarse grains (below 30 grit) work best with softer materials where material can be removed rapidly. Many bench grinders, for example, will have one wheel with a 30 grit and the other with a 60 grit.
When using zip disks (cut-off disks), ensure that your entire face and body are out of the disk’s path and that you wear a face shield and safety glasses. Cases have been well documented where cutting disks have shattered in operation and severely injured or even killed workers.

Never use a cutting disk or blade for grinding purposes. They are designed to cut on their edge only.
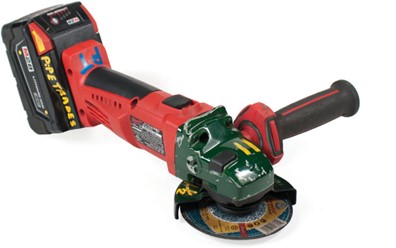
There are some rules that must be observed when using portable grinders:
- Always wear a face shield
- Use a portable shield to prevent sparks from hitting other workers
- Wear leather gloves and protective clothing
- Always use hearing protection
- Use both hands to control the grinder unless the grinder is so small that full control can be achieved with one hand
- Ensure that the RPM rating of the disk or wheel will not be exceeded by the RPM of the tool
- Secure the workpiece to prevent any movement during the grinding operation
- Ensure that the wheel or disk is suitable for the type of material on which you are working
- Ensure that the disk or wheel has not been damaged
- Remove flammable materials before grinding
- Never grind near disassembled components that could be contaminated or damaged by grit and sparks
- Keep sparks away from glass or finished surfaces
- Never remove the guard from a grinder and never use a grinder without a guard
Portable Electric Pipe Fabrication Tools
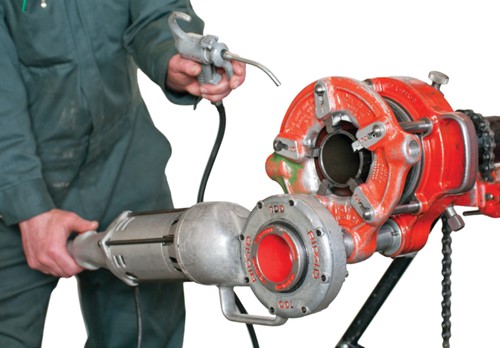
Geared Threader with a Portable Power Drive
- Insert the pipe in the threader and centre the end of the pipe in the throat of the dies.
- Turn the work holder with a socket wrench to centre the pipe and hold it in position.
- Tighten the clamp screw, securely locking the pipe in the work holder.
- Place the oiler directly under the threader.
Notes:
- Long pieces of pipe must be supported by a pipe support, with the pipe free to rotate as it is threaded.
- If the pipe is installed in a tri-stand vise, the die head must be free to rotate. Both the tri- stand vise and the power vise, however, must be bolted to the floor.
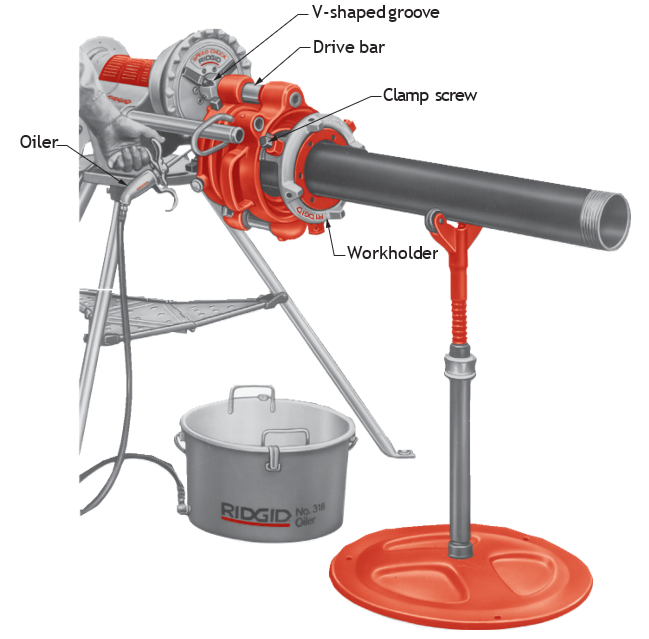
Figure 18 Oiler and geared threader (BC Industry Training Authority, 2019). CC BY-NC-SA 4.0
Pneumatic Portable Power Tools
All air tools require a large volume or flow of compressed air at a specified dynamic air pressure in order to operate efficiently. Dynamic air pressure is described as the pressure that is maintained while the air tool is in use. Static air pressure is the air pressure in the line when the air tool is not in use. The static pressure is always higher than the dynamic pressure. An air line and hose of the correct size are prime factors in maintaining adequate dynamic air pressure.
Filters and Regulators
When air is excessively wet, water shoots out of the exhaust port, which is unpleasant for the operator and can damage the work. In cold weather, moisture in the tool’s air passages may freeze, rendering the tool inoperable.
Most of the moisture is removed at the compressor before it can enter the system. To remove any moisture still remaining, a filter and moisture separator is located at the beginning of the air-line hose. The trap on the water separator should be drained on a daily basis when the system is in regular use.
The regulator regulates the air pressure. A gauge at the front of the regulator shows the pressure reading. Air tools are rated for capacity and performance at an operating air pressure according to manufacturer’s specifications. The pressure regulator should be preset to maintain this level of pressure at the tool.
Lubricator
The manufacturer’s instructions for each type of tool should be followed, since lubrication requirements of air tools are different. Air tools require specially formulated air tool oil. Other oils, unless specifically recommended, should not be used because they can cause sticking and sluggish performance. In addition, some lubricants may contain toxic additives, which become a serious respiratory hazard when vapourized.
Some air tools have built-in oil reservoirs for continuous lubrication. The best way to ensure proper air tool lubrication is to connect air line lubricators at the end of each pipeline leading to an air tool hose. The air-line lubricator mixes a small amount of oil with the air, and all parts of the tool except those requiring a grease lubricant are then kept adequately lubricated. The lubricator reservoirs are usually made from clear plastic, allowing the oil level to be checked easily.
Air Hose
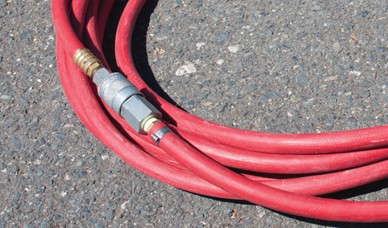
Air hoses must be protected from cuts and other damage and from oil or grease. Never drive over them or use them to pull attached air tools across the ground or floor.
Never leave air hoses lying on the floor where they can become damaged or weakened by being run over by vehicles or equipment. Store hoses so that the ends are connected.
Air-Impact Wrench
Be careful when using large impact wrenches, as the torque can twist the tool out of your hands.
The pneumatic impact wrench shown has a square drive. Torque is controlled by regulating the airflow to the motor of the wrench. Even though there is little torque reaction, air-impact wrenches can produce very high torque values and you need to exercise caution. In-line air pressure regulators are sometimes required to control torque.
Air-Operated Grinder
A portable pneumatic grinder is more convenient to use if a 1 m (3 ft.) foot whip (leader) hose is attached directly to the tool and the air-line coupling is away from the tool. Although larger hoses are preferred for many pneumatic grinders, all hoses must have inside diameters of at least [latex]\frac{1}{4}[/latex] in. Before using, adjust the throttle lever stop-screw. The grinder speed is regulated by the distance the throttle lever is pulled or turned.
Air Hammers and Chisels
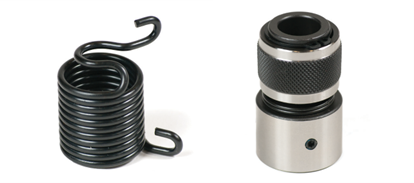
An air hammer or chisel may incorporate the use of a tool retainer. Its primary purpose is to keep the chisel or other attachment from flying off the end of the pneumatic hammer due to the intense vibration and percussive force generated during use. One type of tool retainer is the beehive spring, which threads on the barrel. The quick-change spring (a slight design variation of the beehive spring) has a retaining hook that can be pushed sideways for fast and easy tool bit installation or removal. To provide a more secure hold, a U-shaped safety collar can be used with either spring. Another retainer that reduces the possibility of a tool bit becoming loose is the safety sleeve. The safety sleeve is not used in conjunction with a spring but simply threads on the barrel.
The following safety rules apply to air hammers and chisels:
- Always use hearing and eye protection
- Always point the tool away from yourself and anyone else
- Always disconnect the air hose when changing the tool end
General Safety Precautions for Pneumatic Tools
The following safety rules apply to all pneumatic tools:
- When you use or work around a pneumatic tool, wear hearing protection, safety glasses with side shields, and steel-toed safety boots.
- Always inspect the air hose for fraying, kinks, loose or clogged fittings and air leaks.
- Keep the stapler or nailer pointed in a safe direction. Never assume that the stapler or nailer is empty. The tool you think is empty may fire and seriously hurt you or a fellow worker.
- Disconnect the tool from the air supply when you load the tool or change the depth of drive adjustment.
- Always disconnect the tool from the air supply to clear a jam, to change tool bits, or when you have completed the task.
- Carry the tool by the handle only. Never carry it by the air hose and do not touch the trigger while you carry it.
- Never operate a pneumatic tool if it is not working properly.
- Always use the recommended air pressure and check the gauge twice a day. Never use bottled air or gases to power the tool as they could cause the tool to explode.
- Clean the tool at least daily and lubricate it as needed. Never operate a dirty tool.
- Do not weaken the tool housing by abusing the tool: do not throw the tool, strike the tool housing, or use the tool as a hammer.
Powder-Actuated Tools
Powder-actuated tools, like any power tool, can be extremely dangerous if handled improperly. For that reason, they must be used in accordance with local Workplace Safety Regulations. Strict attention must also be paid to the manufacturer’s instruction manual.
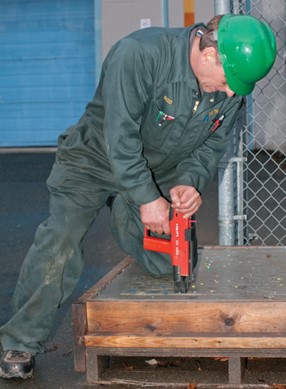
To ensure proper operation of the double guidance system, these points should be considered:
- The washer must fit snugly into the chamber.
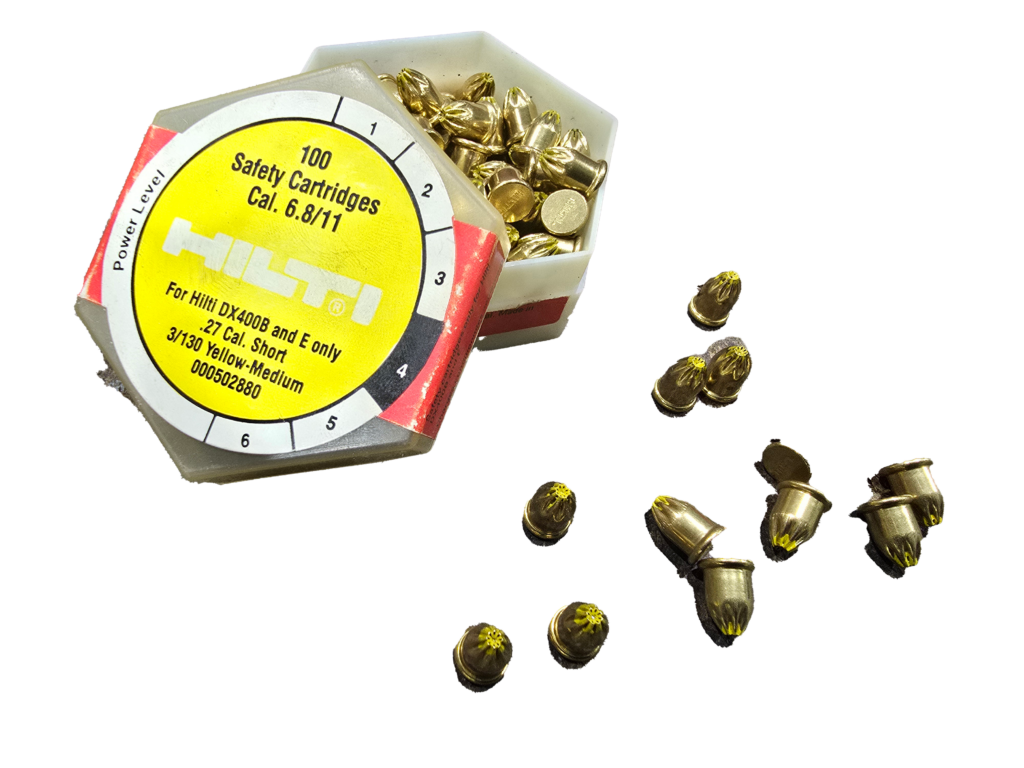
- The proper cartridge and fastener must be selected for the tool being used.
- The piston and the nail are each number coded. The numbers must match.
In selecting fasteners, the operator of the powder-actuated tool must also consider:
- The type of material to be penetrated: concrete or steel?
- The amount of penetration required.
▸ For concrete, approximately 25 mm (1 in.) penetration is required. For steel, penetration should be a maximum of 12 mm ([latex]\frac{1}{2}[/latex] in.).
- The length of fastener required.
▸ Type of material plus amount of penetration will determine the length of the nail. For example, to fasten a 50 mm × 100 mm (2 in. × 4 in.) onto concrete, a 75 mm (2[latex]\frac{7}{8}[/latex] in.) nail would be needed for 25 mm (1 in.) penetration into the concrete.
Material Suitability for Powder–Actuated Fasteners
Fasteners can be set into two materials only: concrete and steel.
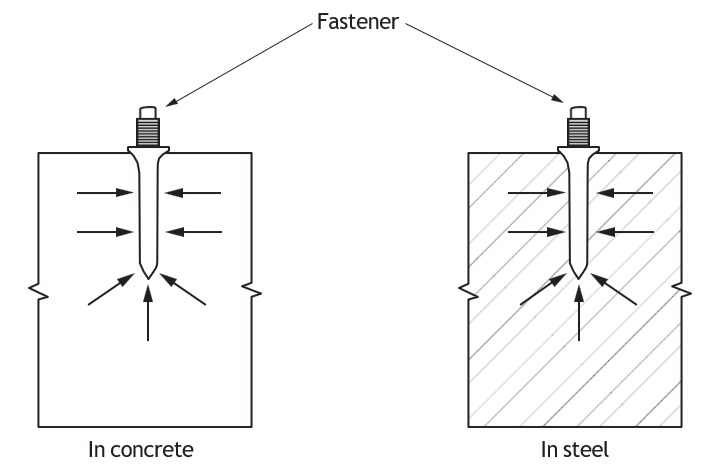
The holding ability of a powder-actuated fastener depends on the force of compression of the material into which the fastener is driven. On penetration, the fastener displaces and compresses the material. The material then tries to return to its original form and, in that effort, exerts a squeezing effect (Figure 24). This is called holding action.
Concrete
Notes about driving fasteners into concrete:
- The fastening pin must be set only into the solid part of the concrete block. Also, because only the horizontal joint is under pressure, never fire a fastener into the vertical mortar joint.
- The minimum thickness of concrete into which a fastener can be set must be three times the penetration of the fastener; but at no time may the concrete be less than 75 mm (3 in.) thick. When fastening into concrete block, be sure the web is at least 75 mm (3 in.) thick.
- Fastenings must always be at least 75 mm (3 in.) away from a concrete edge.
A good way to determine if a concrete block has a rating adequate for a powder-actuated fastener is to test its strength by using a fastener as a centre punch.
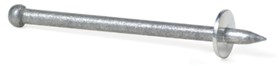
Set the fastener against the concrete. Strike the fastener with a hammer and note the effect. If the concrete is not marked, it is too hard for fastening.
In addition to avoiding concrete that is too soft, too hard, or brittle, follow these additional “do-not” safety rules:
- Do not set a fastener into an area where bits of concrete have exploded away as a result of an earlier attempt to insert a fastener. These chipped surfaces, known as spalled areas, are hazardous for powder-actuated fastenings.
- Do not attempt a fastening into precast concrete beams containing pre-stressed cables. Pre-stressed cables struck by a fastener may cause the beam to weaken. In extreme cases, the beam could fail or the cable could rupture and cause injury.
- Do not attempt to set powder-actuated fasteners close to the edge of a concrete block. The block will shatter.
- Do not use a powder-actuated tool where atmospheric conditions are conducive to an explosion or fire. Flammable vapours can be ignited by the spark when the tool is fired.
Steel
Steel must be at least 5 mm ([latex]\frac{3}{16}[/latex] in.) thick for powder-actuated fastenings; but the operator should expect penetration of up to 12 mm ([latex]\frac{1}{2}[/latex] in.). (The tip will protrude through [latex]\frac{3}{16}[/latex] in. steel.)
The fastening pin must be a minimum of 50 mm (2 in.) away from any weld or torch cut and at least 12 mm ([latex]\frac{1}{2}[/latex] in.) away from the edge of the steel.
To determine whether or not it is safe to set a fastener into steel, use the fastener as a centre punch. If, when struck with a hammer, the fastener marks the steel, it will penetrate.
Materials that may be fastened onto concrete or steel are:
- Wood
- Plywood
- Sheet metal
- Plastic
Note: Threaded or eyelet fasteners are used for holding light materials or loads, such as suspended ceilings.
Materials that cannot be fastened onto concrete or steel are:
- Brick
- Ceramic tiles
- vitrified tiles
- Glass
- Asbestos
Powder-Actuated Tool Regulations
Most jurisdictions require that operators of powder-actuated tools be trained or certified before using the equipment to ensure safe operation and handling. Guidance on the safe use of powder-actuated tools is provided by organizations such as CCOHS: Powered Hand Tools – Powder-Actuated Tools webpage, and workplace requirements are set out in provincial health and safety regulations, including Powder Actuated Tools 12.51 Standards in the Occupational Health and Safety Regulation of British Columbia (WorkSafeBC) webpages. These sources outline requirements for operator training, safe handling, storage of power loads, and the proper use of fasteners and equipment.
The following sample regulations and safety practices illustrate common requirements for the safe use of powder-actuated tools and should be considered good practice. Always consult the applicable workplace health and safety regulations in your jurisdiction and follow the manufacturer’s instructions for the specific tool being used.
- A low-velocity powder-actuated tool, with a fastener test speed rating of less than 100 m (330 ft.) per second, must be used unless no low-velocity tool is available on the market that is capable of doing the fastening task.
- When not in use, a powder-actuated tool must be unloaded and the tool and power loads must be securely stored and accessible only to qualified and authorized persons.
- Power loads of different power levels and types must be kept in different compartments or containers.
- Only a qualified person may handle or use a powder-actuated tool or power loads.
- The operator must have immediately available when using or servicing a powder-actuated tool:
▸ a copy of the manufacturer’s operating instructions for the tool
▸ a copy of the power load and fastener charts for the tool, and
▸ any accessories or tools needed for use or field servicing of the tool, including personal protective equipment
- A powder-actuated tool must not be used in an explosive or flammable atmosphere.
- A powder-actuated tool may only be loaded when it is being prepared for immediate use, and must be unloaded at once if work is interrupted after loading.
- A powder-actuated tool must not be pointed at any person.
- If a powder-actuated tool misfires, the operator must hold the tool firmly against the work surface for at least 5 seconds. Then follow the manufacturer’s instructions for such occurrences and, until the cartridge has been ejected, keep the tool pointed in a direction that will not cause injury to any person. Place the misfired cartridge into water to prevent accidental discharge.
- A powder-actuated tool fastener must not be driven into very hard or brittle materials, such as cast iron, glazed tile, hardened steel, glass block, natural rock, hollow tile, and most brick.
- A powder-actuated tool fastener may only be driven into easily penetrated or thin materials or materials of unknown resistance if the receiving material is backed by a material that will prevent the fastener from passing completely through.
- A powder-actuated tool fastener must not be driven into steel within 13 mm ([latex]\frac{1}{2}[/latex] in.) of an edge, or within 50 mm (2 in.) of a weld except for special applications permitted by the tool manufacturer.
- Except for special applications recommended by the manufacturer, a powder-actuated tool fastener may not be driven into masonry materials:
▸ Within 75 mm (3 in.) of an unsupported edge with a low velocity tool, or
▸ Within 150 mm (6 in.) of an unsupported edge with a medium or high velocity tool
▸ A powder-actuated tool fastener must not be driven:
▸ Into concrete unless material thickness is at least 3 times the fastener shank penetration
▸ Into any spalled area, or
▸ Through existing holes unless a specific guide means, as recommended and supplied by the tool manufacturer, is used to assure positive alignment. - Clean powder-actuated tools daily or after every 100 fastenings.
- Only have authorized service shops repair defective tools.
 Self-Test B-2.2: Use Portable Power Tools
Complete Self-Test 2.2 and check your answers.
If you are using a printed copy, please find Self-Test A-2.2 and Answer Key in the Appendix at the end. If you prefer, you can scan the QR code with your digital device to go directly to the interactive Self-Test.

References
BC Industry Training Authority. (2019). Piping trades apprenticeship program: Use Tools and Equipment—Level 1 harmonized [Binder]. Crown Publications, Queen’s Printer for British Columbia. https://www.crownpub.bc.ca/Product/Details/7960000261_S
Camosun College. (2019). Line C: Tools and Equipment—Competency C-2: Describe Common Power Tools and Their Uses (Rev. ed.) [Learning guide]. BCcampus. https://collection.bccampus.ca/textbook/zAYtfTec/
Camosun College. (2015). Trades Access Common Core Competency C-2: Describe Common Power Tools and Their Uses. Victoria, B.C.: Crown Publications. Download for free from the B.C. Open Textbook Collection (https://open.bccampus.ca/browse-ourcollection/find-open-textbooks/).
Canadian Centre for Occupational Health and Safety. (n.d.). Powder-actuated tools. Canadian Centre for Occupational Health and Safety.
https://www.ccohs.ca/oshanswers/safety_haz/power_tools/powder.html [last revised: 2022-12-23]
WorkSafeBC. (n.d.). Occupational health and safety regulation, Part 12: Tools, machinery and equipment—Powder-actuated tools (ss. 12.51–12.57). WorkSafeBC.
https://www.worksafebc.com/en/law-policy/occupational-health-safety/searchable-ohs-regulation/ohs-regulation/part-12-tools-machinery-and-equipment#SectionNumber:12.51 [Amended by B.C. Reg. 312/2003, effective October 29, 2003.]
Media Attributions
All figures are sourced from Industry Training Authority (2019) and/or Camosun College (2019) and are used under the Creative Commons Attribution 4.0 (CC BY 4.0) licence unless otherwise noted. Images copyrighted by the BC Industry Training Authority are licensed under a Creative Commons Attribution-NonCommercial-ShareAlike 4.0 (CC BY-NC-SA 4.0) licence.
RIDGID tool images are used with permission from Emerson Professional Tools. Some of these images may have been carried forward from SkilledTradesBC learning resources; however, permission has been obtained directly from Emerson Professional Tools for their use here.
The width of material removed by a cutting tool such as a saw blade. (Section B-1.1; Section B-2.2)
A twisting force applied to a fastener or tool. (Section B-1.1)
Concrete that has chipped, cracked, or broken away from the surface, often due to impact, weathering, or stress. (Section B-2.2)
A thin abrasive cutting disk used with a grinder to cut metal or other hard materials. It cuts quickly along the edge of the disk and should not be used for grinding on the side. (Section B-2.2)
A device used on tools such as pneumatic hammers to hold a tool bit, chisel, or attachment securely in place during operation. (Section B-2.3)
A strong striking or hammering force produced by a tool that repeatedly hits a surface to break, chip, or penetrate material. (Section B-2.2)
A coiled spring retainer used on some pneumatic hammers to hold the chisel or tool bit securely in place during operation. (Section B-2.1)
A type of tool retainer used on pneumatic hammers that allows the operator to quickly install or remove a chisel or tool bit by pushing the spring aside. (Section B-2.2)
A U-shaped metal collar used on pneumatic hammers with a spring retainer to help keep the tool bit securely in place and prevent it from becoming loose during operation. (Section B-2.1)
A device used to hold materials together, such as a nail, bolt, or screw. (Section B-1.1)
The depth that a fastener, drill bit, or cutting tool enters into a material during use. (Section B-2.2)
A hardened steel nail or pin that is driven into materials such as concrete or steel using a powder-actuated tool powered by a small explosive charge. (Section B-2.2)
The force that keeps a fastener securely in place after it is driven into a material. It occurs when the surrounding material compresses around the fastener and presses tightly against it. (Section B-2.1)